Author: Sasikanth M

  • Monocil 36% SL: When is it safe to use?

    TL;DR — Monocil Is a Heavy-Duty Tool, Not a Routine Spray

    • Monocil 36% SL (Monocrotophos 36% SL) is a high-potency systemic organophosphate insecticide effective against severe stem borers, hoppers, and sucking pests — but classified WHO Class Ib (Highly Hazardous).
    • When it’s appropriate: Severe internal pest attacks (stem borers) on non-edible ornamental trees and shrubs, where safer options have already failed and label conditions are fully met.
    • When it’s not appropriate: Vegetables near harvest, kitchen gardens, light infestations manageable by pruning or safer contact sprays, anywhere children and pets cannot be strictly excluded.
    • Many countries have restricted or phased out Monocrotophos on food crops. Always check current Indian label registration and crop authorisation before use.
    • For most home garden pest problems — mealybugs, aphids, thrips on vegetables and ornamentals — a safer systemic like TATA Tafgor (Dimethoate 30% EC) achieves the same systemic reach at significantly lower human toxicity.

    What Is Monocil 36% SL and How Does It Work?

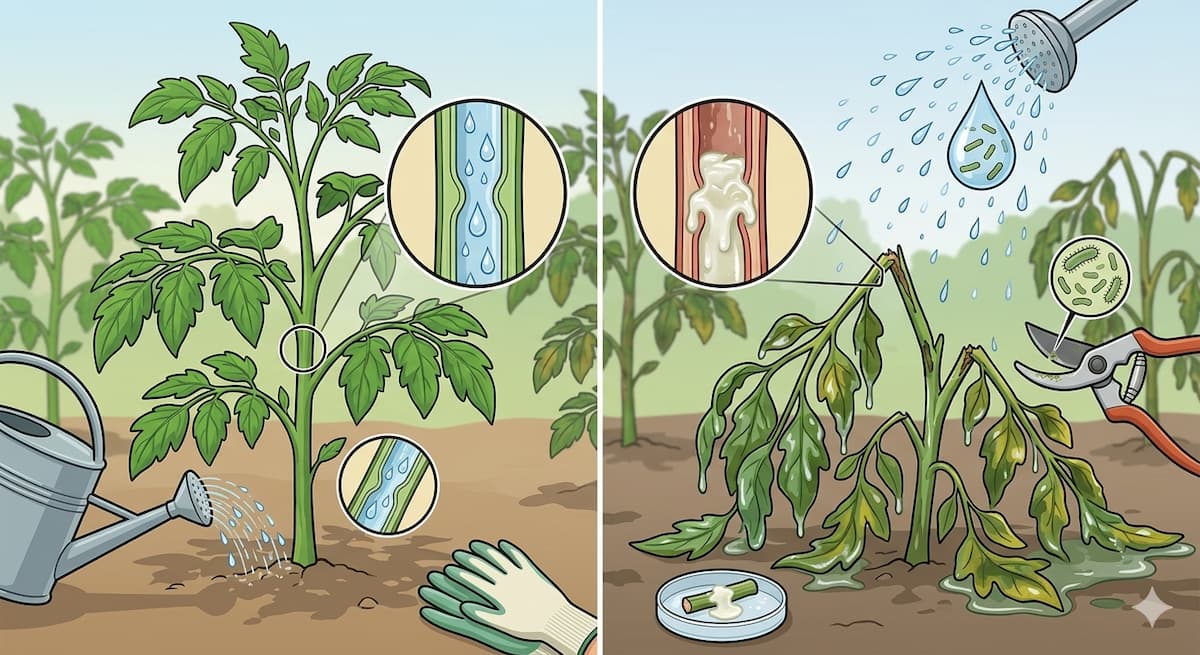
    Monocil 36% SL contains Monocrotophos 36% SL — a systemic organophosphate insecticide formulated as a soluble liquid. Like all systemic insecticides, it works by being absorbed into the plant and transported through the vascular system rather than acting only on the surface.

    Key properties of Monocrotophos:

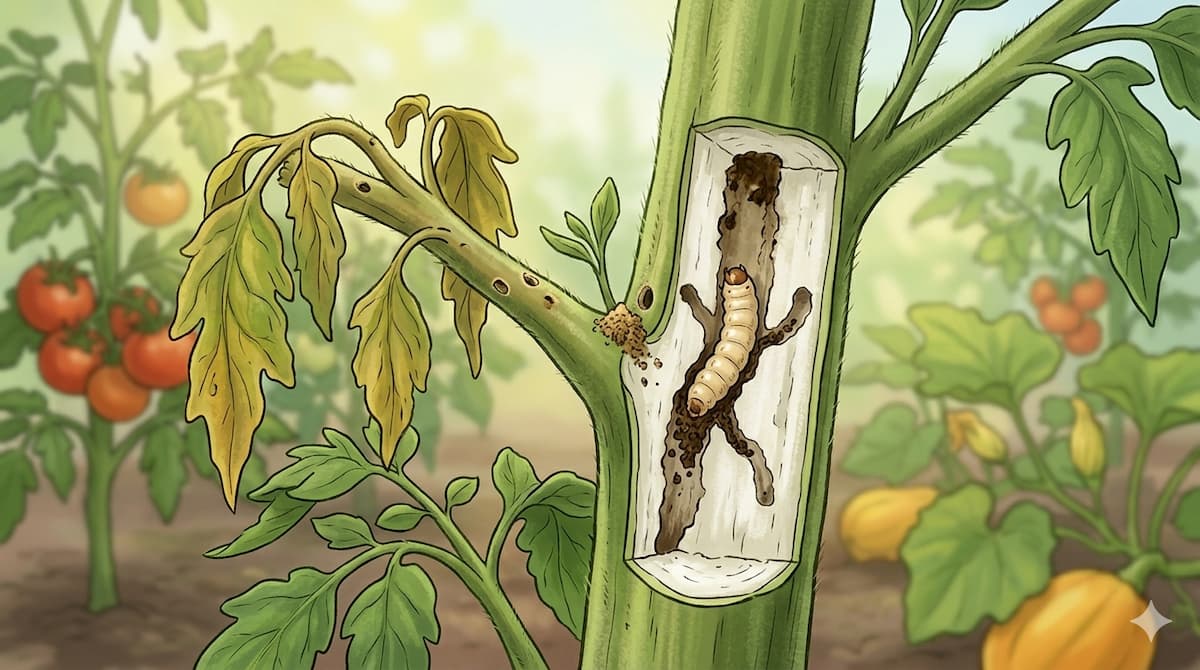
    • Systemic action: Absorbed through leaves and roots; moves through phloem to reach internal feeding insects, including stem borers protected inside plant tissue.
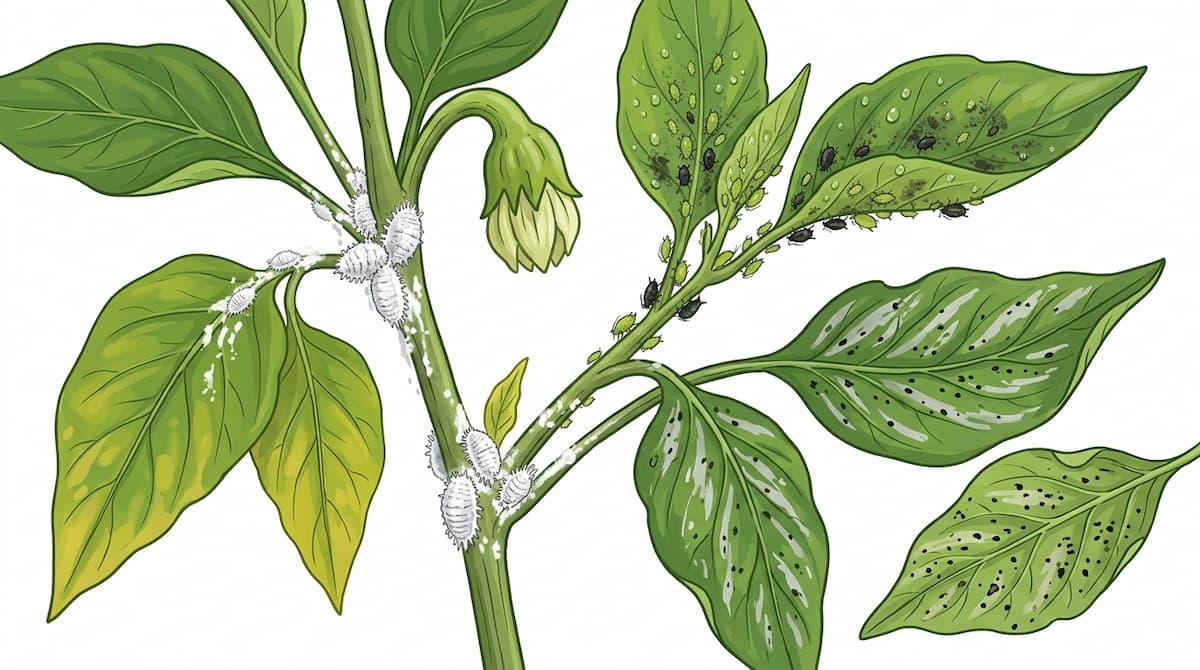
    • Broad spectrum: Effective against a wide range of chewing and sucking pests — stem borers, leafhoppers, aphids, mealybugs, whiteflies, and thrips.
    • Fast acting: Insects feeding on treated plant sap typically die within hours to 1–2 days.
    • High toxicity: Also highly toxic to mammals, birds, aquatic organisms, and beneficial insects — more acutely toxic than most other registered organophosphates still in common use.
    📋 Monocrotophos vs. Other Common Organophosphates — Toxicity Comparison

    Product Active Ingredient WHO Toxicity Class Systemic? Appropriate For
    Monocil 36% SL Monocrotophos 36% SL Class Ib — Highly Hazardous ✅ Yes Severe borers on authorised non-edible ornamentals
    TATA Tafgor Dimethoate 30% EC Class II — Moderately Hazardous ✅ Yes Mealybugs, aphids, thrips on ornamentals and authorised crops
    Lethal Chlorpyriphos 20% EC Class II — Moderately Hazardous ❌ Contact only Soil pests, surface-feeding insects on authorised crops
    Sentry Lambda-Cyhalothrin Class II — Moderately Hazardous ❌ Contact only Broad-spectrum knockdown on ornamentals

    When Can Monocil 36% SL Be Considered in a Home or Ornamental Garden?

    Monocil 36% SL has a narrow appropriate use window in home gardens. It should be considered a last-resort, specific-situation tool — not a routine pest management product. The following conditions should all be true before reaching for it:

    • The pest is an internal feeder (stem borer, trunk borer) that cannot be reached by surface contact insecticides — or a severe sucking pest outbreak on ornamentals where Dimethoate has already been tried and failed.
    • The plant is non-edible — an ornamental tree, decorative shrub, or non-food plant where no harvest PHI concern exists.
    • The use is authorised — Monocrotophos is registered on the label for the specific plant type and pest you are targeting. Never use off-label.
    • Safer options have been tried and failed — physical removal (pruning), water washing, and a WHO Class II systemic (e.g., Dimethoate 30% EC) have not controlled the infestation.
    • Full safety controls are achievable — you can wear proper PPE, exclude children and pets for at least 72 hours, and prevent spray drift towards edible plants, water, or public areas.

    When Should You Absolutely NOT Use Monocil 36% SL?

    The list of situations where Monocil is inappropriate in a home garden is longer than the list where it is appropriate. Do not use it when:

    Situation Why Monocil Is Inappropriate Better Alternative
    Leafy vegetables (spinach, fenugreek, coriander) at any stage Monocrotophos is systemic — residue in consumed leaf tissue. PHI may exceed crop cycle length. Neem-based products, approved bio-insecticide, or remove infested material manually
    Fruit and vegetables near harvest (tomato, chilli, brinjal) Consuming produce before PHI expires risks unsafe residue ingestion Physical pest removal; wait for next crop cycle
    Light mealybug or aphid infestation on ornamentals Dimethoate 30% EC achieves the same systemic reach with 5× lower acute toxicity TATA Tafgor (Dimethoate 30% EC)
    Kitchen or balcony gardens with food crops Spray drift, runoff, and surface residue in mixed growing environments create unacceptable food safety risk TATA Tafgor or approved safer systemic for the specific crop
    Near fish tanks, ponds, or open water Monocrotophos is acutely toxic to fish at very low concentrations Any application — maintain strict 10-metre exclusion from all water bodies
    Areas where children or pets cannot be excluded for 72+ hours Residue on plant surfaces after drying is still hazardous for several days due to high oral and dermal toxicity Use safer products where access cannot be strictly controlled
    Routine spray for general prevention No justification for high-toxicity, high-risk application when pest is not present or is light Preventive sprays with Class II systemics; cultural controls

    Pre-Harvest Interval (PHI): Why It Is Non-Negotiable with Monocrotophos

    The Pre-Harvest Interval (PHI) is the minimum number of days that must pass between the last spray application and harvesting produce for consumption. For a systemic insecticide like Monocrotophos, the PHI is not a conservative suggestion — it is the scientifically determined minimum time for the active ingredient to degrade to a safe residue level in the edible tissue.

    Key facts about Monocrotophos PHI:

    • PHI for Monocrotophos varies by crop and is specified on the product label — look it up for every crop before applying.
    • Because Monocrotophos moves systemically into all plant tissues (including fruit, seeds, and edible leaves), surface washing does not remove residue from edible parts.
    • If your crop will be harvested before the PHI expires, do not spray. Choose a product registered for your crop with a PHI that fits your harvest schedule.
    • For ornamental plants with no edible harvest, PHI is not a concern — but the human re-entry interval (typically 48–72 hours for Class Ib products) must still be observed.
    💡 The Key Question Before Any Monocrotophos Application

    Before opening the Monocil bottle, ask yourself: “Is this plant authorised on the label, and will the PHI be completed before any harvest — including any nearby edible plants that spray drift could reach?” If the answer to either part is “no” or “I’m not sure”, close the bottle and choose a safer registered product. For most home garden sucking pest problems, TATA Tafgor (Dimethoate 30% EC) provides the systemic action you need at significantly lower risk.

    What Are the Safer Systemic Alternatives to Monocil for Home Gardens?

    For the vast majority of home garden pest situations that require systemic action, lower-toxicity registered alternatives are available and effective:

    For Hidden Sap-Sucking Pests (Mealybugs, Aphids, Thrips)

    TATA Tafgor (Dimethoate 30% EC) — a WHO Class II systemic organophosphate. Absorbed into plant sap; kills sucking pests when they feed regardless of their hiding location (inside flower buds, tight leaf axils, stem joints). Appropriate for ornamentals and many registered vegetable crops at label dose. Far better safety profile than Monocrotophos for routine home garden use.

    Buy TATA Tafgor (Dimethoate 30% EC)

    For Visible, Surface-Active Insects and Mixed Popluations

    Sentry (Lambda-Cyhalothrin) — a WHO Class II broad-spectrum contact pyrethroid. Effective for swift knockdown of visible aphid colonies, mixed pest populations on ornamentals, and adult-stage borers before they enter plant tissue. Not systemic, but useful as a preventive first treatment during adult borer egg-laying season.

    Buy Sentry (Lambda-Cyhalothrin)

    For Fungal Diseases (Not Insect Pests)

    If you are treating what you think is a stem borer but it turns out to be a fungal stem rot, switch to a registered fungicide — UPL SAAF (Carbendazim 12% + Mancozeb 63% WP) for broad-spectrum fungal coverage, or copper-based products for bacterial issues. Using Monocil on a fungal problem accomplishes nothing and creates unnecessary exposure.

    If You Do Use Monocil: Safety Rules You Cannot Skip

    ⚠️ Mandatory Safety Protocol — Monocil 36% SL (Monocrotophos: WHO Class Ib Highly Hazardous)

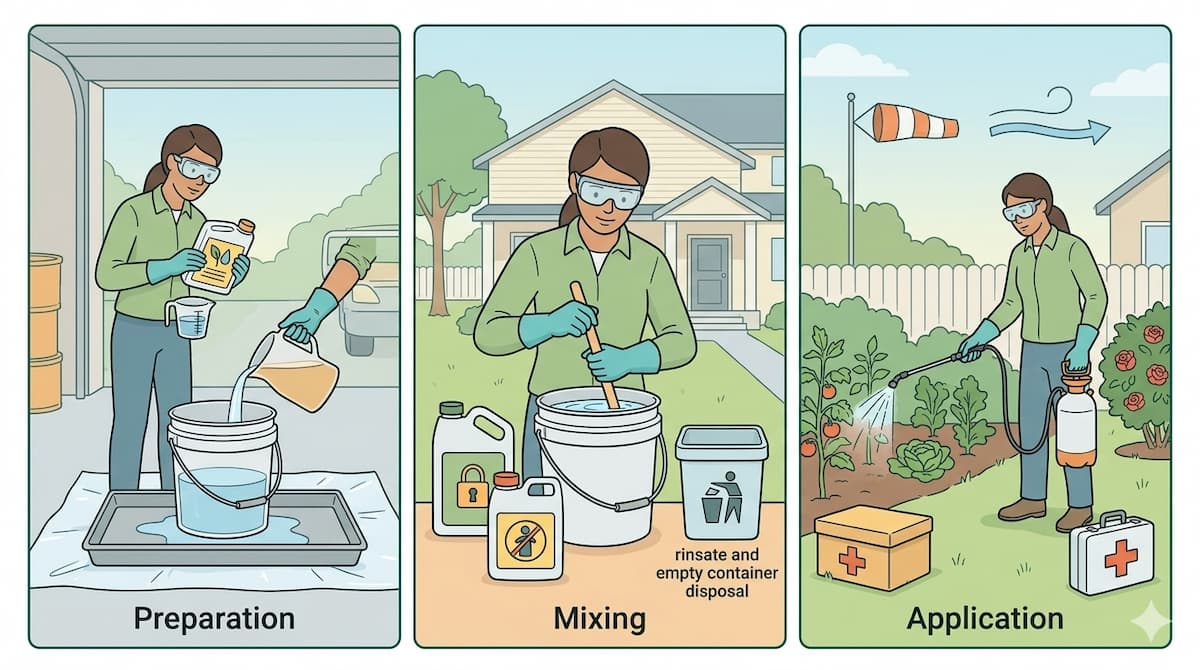
    • PPE — no shortcuts: Full chemical-resistant rubber gloves (not nitrile gloves alone), a full-face respirator (not a simple dust mask or surgical mask), chemical-resistant goggles sealed against the face, a full-body chemical-resistant apron or disposable Tyvek coverall, long trousers tucked into rubber boots. All PPE on before uncapping the bottle.
    • Ventilation: Mix and apply exclusively in open outdoor areas. Never in enclosed, semi-enclosed, or poorly ventilated spaces. Stand upwind at all times.
    • Dedicated equipment only: Use a sprayer, mixing bucket, and measuring tools that are permanently designated for pesticide use only — not shared with any kitchen, food storage, or household cleaning purpose. Label all items “PESTICIDE ONLY”.
    • Children, pets, and bystanders: Clear the entire area — including adjacent plant beds, play areas, and any spaces where drift could reach — before application. Do not allow re-entry for a minimum of 72 hours. Post a visible warning if others share the space.
    • Edible plants in the area: Cover or move all edible plants (herbs, vegetables, fruit trees) out of the spray zone. Spray drift from Monocrotophos onto edible tissue creates a food safety risk. If you cannot guarantee drift-free application, do not spray.
    • Water body exclusion: Maintain a minimum 10-metre exclusion zone from any pond, fish tank, open drain, or rainwater collection. Monocrotophos is acutely toxic to fish, amphibians, and aquatic invertebrates.
    • Pollinator protection: Do not spray when bees or other pollinators are active. Spray only in early morning before 8 AM or at dusk, well away from flowering plants.
    • After spraying: Remove and wash all PPE clothing separately before wearing again. Wash hands, face, and all skin with soap and water immediately. Do not eat, drink, or touch the face until fully cleaned up.
    • Storage: In original, sealed container, in a locked cabinet well away from food, water, children, and animals. Never store near heat sources.
    • Emergency: For accidental ingestion or severe skin/eye exposure — call the National Poison Control Centre: 1800-11-6117 (toll-free) or dial 112. Take the original product bottle to the hospital. The antidote for organophosphate poisoning (atropine sulphate) must be administered medically.

    Should You Use Monocil or Something Else? Quick Decision Guide

    Your Situation Monocil Appropriate? What to Use Instead
    Severe stem borer, large ornamental tree, non-edible ✅ Yes — if label authorised, full PPE available, access can be controlled for 72h
    Mealybugs on hibiscus or crotons (ornamental) ❌ No — overkill; safer options work well TATA Tafgor (Dimethoate 30% EC)
    Aphids or thrips on chilli or vegetables ❌ No — food crop; systemic residue risk TATA Tafgor where registered; observe PHI
    General prevention spray on ornamentals ❌ No — routine prevention does not justify Class Ib product Sentry (Lambda-Cyhalothrin) for knockdown; Tafgor for systemic cover
    Mixed pest outbreak, balcony / kitchen garden ❌ No — children and pets, edible plants, confined space Identify specific pest; use appropriate registered product
    Borer on mango or fruit tree, harvest season approaching ❌ No — PHI cannot be completed before harvest Prune, destroy infested branches; consult a professional

    Frequently Asked Questions About Monocil 36% SL Safety

    Is Monocil 36% SL banned in India?

    As of current regulations, Monocrotophos is not completely banned in India but its use is restricted to specific registered crops and explicitly prohibited on certain food crops, particularly vegetables intended for human consumption. Many countries have withdrawn Monocrotophos registrations entirely due to its high acute toxicity. Always verify the current registration status and label authorisation for your specific crop before purchase or use — regulations can change between product batches and years.

    Can I use Monocil on my lemon tree for stem borers?

    Check the current product label carefully. Monocrotophos may or may not be registered for citrus depending on the specific Monocil product and the current label version. Even if registered, the PHI must be fully observed before consuming any lemons. If the tree is in active fruiting stage with fruit approaching harvest, choose TATA Tafgor (Dimethoate 30% EC) during the vegetative stage only — or use physical pruning and destruction of infested branches as the primary intervention on fruiting trees.

    How is Monocil different from TATA Tafgor (Dimethoate)?

    Both are systemic organophosphate insecticides that move through plant sap to kill internal feeders. The key differences are: Monocrotophos is WHO Class Ib (Highly Hazardous); Dimethoate is WHO Class II (Moderately Hazardous) — a significant step down in acute human toxicity. Monocrotophos is more acutely toxic by several multiples, has narrower crop registration in India, and requires stricter PPE. For home garden sucking pest control and moderate borer issues, Dimethoate 30% EC achieves systemic reach at a materially safer risk level. Monocrotophos is reserved for severe infestations on ornamentals where Dimethoate has proven insufficient.

    What happens if I accidentally spray Monocil on my vegetables?

    Do not consume those vegetables until the full PHI stated on the product label has passed — even if the vegetables look clean. Since Monocrotophos is systemic, surface washing does not remove residue from edible tissue. If harvest is needed before the PHI is complete, discard the affected produce. In future, before any spray application in a mixed garden, temporarily cover or move edible plants using plastic sheeting or cloches to prevent drift contamination.

    I only have a light aphid infestation on my ornamental shrubs. Should I use Monocil?

    No. A light aphid infestation does not justify a Class Ib product. Start with a high-pressure water jet wash to dislodge aphid colonies mechanically. If chemical treatment is needed after that, apply TATA Tafgor (Dimethoate 30% EC) at label rate — it is systemic (meaning it reaches aphids hidden inside leaf curls and axils), significantly less toxic than Monocrotophos, and registered for a wider range of ornamental and crop uses. Monocil is a last-resort tool for severe infestations; light aphid problems are neither severe nor last-resort situations.

    Conclusion: Respect Monocil — But Know When Something Else Is the Right Call

    Monocil 36% SL (Monocrotophos) is a legitimate professional-grade tool that has a specific, narrow role in difficult pest management situations — particularly severe stem borer infestations on large ornamental trees where physical removal is impossible and systemic penetration through the plant’s own sap is the only path to the pest. In that precise situation, used by a prepared gardener with full PPE, correct PPE, and strict access control, it does the job.

    But the same property that makes Monocrotophos effective — its systemic movement through plant tissue — makes it inappropriate anywhere food safety, children, pets, or water body proximity is a concern. The honest answer for most Indian home garden pest situations is that TATA Tafgor (Dimethoate 30% EC) provides equivalent systemic reach at a fraction of the toxicity risk, and should be the default systemic choice for mealybugs, aphids, thrips, and moderate borer pressure. Reserve Monocil for the specific narrow situations where it genuinely cannot be replaced — and when those situations arise, follow the safety protocol without modification.

    Buy TATA Tafgor (Dimethoate 30% EC) — the safer systemic for routine garden use
    Buy Sentry (Lambda-Cyhalothrin) — broad-spectrum contact knockdown for surface pests

  • Stem Borers: The Hidden Danger Inside Your Plant Stems

    Stem Borers: The Hidden Danger Inside Your Plant Stems

    TL;DR — When Insects Live Inside Your Plant Stems

    • If a healthy-looking plant suddenly wilts, breaks at the stem, or shows tiny holes with sawdust-like frass (frass = insect droppings + bore dust), you almost certainly have stem borers — larvae tunnelling inside your plant.
    • Contact insecticides sprayed on the leaf surface cannot reach larvae protected by plant tissue. Only systemic insecticides — absorbed into the plant’s vascular sap — can expose hidden borers.
    • Monocil 36% SL (Monocrotophos 36% SL) is a powerful systemic organophosphate used for stem borer control on authorised crops and ornamentals in India — but it is high-toxicity and requires strict safety protocols.
    • Physical pruning and destruction of infested stems is the mandatory first step before any chemical treatment.
    • Monitor for new entry holes and fresh frass every 7–10 days — early detection is the only cost-effective control strategy.

    What Are Stem Borers and Why Are They So Hard to Control?

    Stem borers are the larvae (caterpillars, grubs, or maggots depending on the parent insect species) of moths, beetles, or flies that complete part of their life cycle inside plant tissue. Unlike leaf-eating caterpillars or sap-sucking insects that live on the plant’s surface, stem borers exploit a nearly impenetrable refuge: the interior of a living stem.

    Their life cycle follows a predictable sequence that explains both the damage pattern and the control challenge:

    1. Adult moths or beetles lay eggs on the plant surface — on leaves, at growing points, or in bark crevices.
    2. Eggs hatch into tiny larvae that initially feed on the surface for a brief period (sometimes only hours) before boring into the stem, midrib, petiole, or trunk.
    3. Once inside, the larva feeds on internal tissue — phloem, cambium, and pith — while growing, often for several weeks.
    4. The larva pupates inside the stem or exits to pupate in soil, and an adult emerges to restart the cycle.

    The control problem is structural: once the larva is sealed inside plant tissue, it is completely shielded from surface-applied contact insecticides. The stem wall acts as physical armour. Only an insecticide that enters the plant itself — a systemic — can follow the larva into its tunnel through the plant’s own sap.

    Which Plants Are Most Commonly Affected by Stem Borers in Indian Gardens?

    Stem borers target a wide range of plants in Indian home and ornamental gardens. The specific species varies by region and season, but high-risk plants include:

    Plant Type Common Borer Species Part Attacked Peak Risk Season
    Ornamental shrubs & trees (hibiscus, rose, jasmine) Clearwing moths (Synanthedon spp.), longhorn beetles Main stems, branches Monsoon and post-monsoon
    Fruit trees (mango, guava, citrus, pomegranate) Bark-eating caterpillar (Indarbela spp.), stem borer beetles Trunk, primary branches Summer and monsoon onset
    Vegetables (chilli, brinjal, tomato) Shoot & fruit borer (Leucinodes orbonalis) Tender shoots, fruit Year-round; peaks in humid conditions
    Ornamental palms and bamboo Red palm weevil (Rhynchophorus ferrugineus), bamboo borer Crown, internodes Summer
    Curry leaf, drumstick (moringa) Bark borer, web worm Main stem, branches Post-monsoon

    How Do You Identify Stem Borer Damage on Garden Plants?

    Stem borer infestations are frequently misdiagnosed as fungal wilt, water stress, or bacterial disease — leading to incorrect treatment and wasted time. Here is the precise diagnostic sequence:

    External Visual Signs

    • Entry holes on stems or branches: Typically 1–5 mm in diameter, often with a slightly ragged or chewed edge. May be partially blocked with compacted frass.
    • Frass accumulation: A distinctive sawdust-like mixture of bore dust, excrement, and chewed plant fibre. Appears at the entry hole or accumulates in a small pile at the base of the plant below the infested stem. Frass is the most reliable early indicator — check stem bases and branch forks regularly.
    • Wilting or yellowing above the damage point: The larva disrupts the vascular tissue (xylem and phloem) inside the stem, cutting water and nutrient flow to everything above. The wilted section looks healthy except for the leaf droop.
    • Easy stem breakage: A borer-hollowed stem has lost structural integrity. Affected stems snap or fold at the borer’s entry level under light pressure or wind.

    Confirmatory Internal Check

    1. Select a wilting or suspicious stem and cut it longitudinally (lengthwise) with a clean blade.
    2. Inspect the pith (centre) of the stem. A borer-infested stem will show: a hollow gallery or tunnel, bore dust and frass inside the channel, and possibly the larva itself — a cream or yellowish grub or caterpillar.
    3. If the stem interior is clean and solid, look for other causes (fungal wilt, bacterial wilt, root rot).
    🔍 The 60-Second Stem Borer Confirmation Test

    Before reaching for any insecticide, confirm the diagnosis. Cut one affected stem lengthwise with a sharp blade. Presence of: (1) a hollow internal tunnel, (2) frass or bore dust inside, and (3) a visible grub = confirmed stem borer. Absence of all three = look for other causes first. This test takes 60 seconds and prevents costly misapplication of systemic insecticides to non-borer problems.

    Why Do Contact Insecticides Fail Against Stem Borers?

    This is the most critical concept for effective stem borer management: the physical location of the larva makes surface treatment strategies largely irrelevant once boring has occurred.

    Insecticide Type How It Works Why It Fails for Stem Borers Effective Against Adult Stage?
    Contact spray (pyrethroids: Lambda-Cyhalothrin, Cypermethrin) Kills insects by direct skin/cuticle contact Cannot penetrate plant stem wall to reach internal larvae ✅ Yes — kills adults and newly hatched larvae before they bore in
    Stomach poison (Chlorpyriphos 20% EC — Lethal) Kills insects that eat treated plant surfaces Larvae are eating internal plant tissue, not treated surfaces ✅ Yes — at early larval stage before entry
    Systemic insecticide (Monocrotophos 36% SL — Monocil; Dimethoate 30% EC — Tafgor) Absorbed by plant; moves through vascular sap; kills insects feeding on treated sap anywhere in the plant N/A — specifically designed to reach internal feeding insects ✅ Yes — also effective against surface-feeding adults

    The practical implication: contact and stomach-poison applications are most valuable as preventive measures, applied before boring begins, to kill adults and newly-hatched larvae before they enter the stem. Once a larva is tunnelling inside, systemic action is required to reach it.

    How Does Monocil 36% SL (Monocrotophos 36% SL) Work Against Stem Borers?

    Monocil 36% SL contains Monocrotophos 36% SL (soluble liquid) — a systemic organophosphate insecticide that is among the most potent systemic options available for stem borer control in India. Its mechanism mirrors other organophosphates:

    1. Monocrotophos is absorbed through leaf and stem surfaces and moves systemically through the plant’s phloem.
    2. Stem borer larvae feeding on the internal phloem and cambium tissue ingest the active ingredient along with nutrients.
    3. Monocrotophos inhibits acetylcholinesterase in the larva’s nervous system — causing uncontrolled nerve signal firing, paralysis, and death within hours to 1–2 days of ingestion.
    4. Because the active ingredient is distributed throughout the plant’s sap system, larvae in any part of the stem are exposed when they feed — regardless of which specific tunnel they occupy.
    ⚠️ Important: Monocrotophos Is a High-Toxicity Organophosphate

    Monocil 36% SL (Monocrotophos) is significantly more acutely toxic than Dimethoate or Chlorpyriphos. It is classified as a WHO Class Ib (Highly Hazardous) pesticide. Its use is restricted on many food crops in India, particularly vegetables and fruit near harvest. It is most appropriately used on non-edible ornamental trees and shrubs where access can be strictly controlled. If you are treating edible plants, confirm Monocrotophos is authorised for your specific crop and observe the pre-harvest interval on the label without exception.

    When Is Monocil 36% SL Appropriate for Home and Ornamental Gardens?

    Not every stem borer situation requires Monocrotophos. Use this decision framework to determine the right level of intervention:

    Situation Recommended Action
    1–2 borer holes, small ornamental shrub, frass visible Prune and destroy infested stems. Monitor × 2 weeks. No chemical needed yet.
    Multiple holes, clear internal tunnelling, ornamental tree Prune what you can, then apply Monocil 36% SL at label rate to remaining plant.
    Trunk borer on large ornamental/fruit tree Monocil foliar spray + targeted injection into entry holes with a syringe (where label allows). Consider professional pest control for large trees.
    Borer on edible vegetable (chilli, brinjal shoot borer) Check if Monocrotophos is registered for that crop. If not authorised, use a registered alternative like Dimethoate 30% EC (TATA Tafgor) at label rate during vegetative stage only.
    Borer on edible fruit tree near harvest Do not use high-toxicity systemics. Prune and destroy. Consult a professional for integrated management.

    Step-by-Step Stem Borer Treatment Protocol for Home Gardens

    1. Diagnose and confirm.
      Cut one wilting stem lengthwise. Confirm the presence of an internal tunnel, frass, and/or a larva before proceeding. Do not apply systemic insecticides if the diagnosis is uncertain.
    2. Prune and immediately destroy all heavily infested stems.
      Use clean, sharp pruning shears. Cut back to healthy, uninfested tissue — at least 5 cm below the last visible frass or tunnel. Seal all cut stems in a plastic bag immediately and dispose away from the garden. Do not leave cut infested material on the ground — larvae can exit and re-bore.
    3. Disinfect pruning tools between cuts.
      Dip shears in a 10% bleach solution between each cut to prevent spreading any bacterial pathogens that may be secondary to borer wounds.
    4. Mix and apply systemic insecticide.
      For ornamental plants: mix Monocil 36% SL (Monocrotophos) at the label-recommended dose in water. Apply as a thorough foliar spray covering stems, branches, and leaves. For larger borer holes in thick stems or tree trunks, a small volume of diluted solution can be injected directly into the entry hole using a large-bore syringe — only when the label permits this application method.
    5. Apply at the right time of day.
      Spray in early morning (before 9 AM) or evening (after 5 PM). Systemics require leaf absorption — avoid spraying in direct midday sun or before expected rain.
    6. Inspect at 7–10 days for fresh frass.
      New frass at entry holes indicates surviving or newly-emerged borers. Repeat treatment once within label-specified maximum applications per season.
    7. Monitor monthly thereafter.
      Check stem bases, branch forks, and trunk surfaces for new entry holes. A monthly 5-minute inspection prevents reinfestation from escalating to a treatment-requiring level.

    Buy TATA Tafgor (Dimethoate 30% EC) — Systemic for authorised vegetable crops

    How to Prevent Stem Borers from Infesting Your Garden Plants

    Preventing borer entry is far more effective than treating an established infestation. Once a larva is tunnelling inside a thick stem or trunk, even systemic treatment has limits — and the structural damage to the plant cannot be undone.

    • Preventive systemic sprays during high-risk seasons: Apply a systemic insecticide (Dimethoate 30% EC or approved product for your crop) during the period when adult moths and beetles are laying eggs — typically at monsoon onset and early post-monsoon. This kills newly-hatched larvae before they bore in.
    • Seal pruning wounds immediately: Fresh cut branches are attractive entry points for adult stem borers. Apply a copper-based wound paste or Bordeaux paste immediately after pruning to seal the wound and deter egg-laying at cut surfaces.
    • Maintain plant vigour: Stressed, drought-weakened plants emit volatile compounds (ethylene, terpenes) that attract bark beetles and stem borers. Keep plants well-watered (not waterlogged) and nutritionally balanced — a health plant is less attractive and better able to resist larval penetration.
    • Remove dead wood promptly: Dead branches are preferred oviposition (egg-laying) sites for many stem borer species. Cut and remove dead wood as soon as it appears rather than leaving it on the plant.
    • Inspect nursery plants before purchase: Stem borers can be introduced on newly purchased plants, especially container-grown ornamental trees. Check stems and trunks for entry holes and frass before bringing any new plant into your garden.

    Safety Protocols for Monocil 36% SL and High-Toxicity Systemics

    ⚠️ High Hazard — Safety Protocols for Monocrotophos (Monocil 36% SL)

    • WHO Classification: Monocrotophos is classified as Class Ib — Highly Hazardous. Treat it with significantly higher caution than Dimethoate or Lambda-Cyhalothrin.
    • Full PPE is mandatory: Chemical-resistant rubber gloves (not nitrile alone), a full-face respirator (not just a dust mask), safety goggles, a chemical-resistant apron or full Tyvek suit, long sleeves, full-length trousers, and rubber boots. No shortcuts on PPE with Monocrotophos.
    • Ventilation: Mix and apply only in open areas. Keep upwind at all times. Never spray in enclosed or semi-enclosed spaces even with ventilation.
    • Children, pets, and livestock: Remove completely from the area before application. Do not allow re-entry for a minimum of 72 hours or until confirmed dry. Monocrotophos is acutely toxic to mammals, birds, and beneficial insects.
    • Crop restriction: Monocrotophos use is restricted or prohibited on many food crops, especially vegetables, in India. Never use on crops where it is not registered. If uncertain, use Dimethoate 30% EC (TATA Tafgor) as a less toxic alternative for authorised crops.
    • Water body and aquatic safety: Monocrotophos is highly toxic to fish and aquatic life. Do not spray near ponds, streams, open drains, or rainwater collection. Keep a minimum 10-metre exclusion zone from all water bodies.
    • Emergency: In case of accidental ingestion or severe exposure, call the National Poison Information Centre (AIIMS): 1800-11-6117 (toll-free). Take the original product label to the hospital — the specific active ingredient name is required for treatment. Atropine sulphate is the antidote for organophosphate poisoning — only administered medically.
    • Professional alternative: If you are not comfortable handling Class Ib pesticides yourself, consider engaging a licensed pest control professional, especially for large tree borers or severe ornamental infestations.

    Frequently Asked Questions About Stem Borers in Indian Gardens

    How do I know if my plant has stem borers or bacterial wilt?

    Both cause sudden wilting, but the tell-tale difference is frass and entry holes. Bacterial wilt (Ralstonia solanacearum) shows stem ooze when a cut stem is placed in water (milky thread-like streams). Stem borers show a hollow internal tunnel with bore dust and frass when the stem is cut open. No ooze in clear water, but hollow interior = stem borer. Milky ooze in water = bacterial wilt. These two problems require completely different treatments.

    Can I use Dimethoate (TATA Tafgor) instead of Monocrotophos for stem borers?

    Yes, for authorised crops and moderately severe infestations. Dimethoate 30% EC (TATA Tafgor) is a systemic organophosphate that moves through plant sap and kills stem borer larvae when they feed. It is less acutely toxic than Monocrotophos (WHO Class II vs Class Ib) and more broadly registered for food crops. For lighter borer infestations on vegetables or fruit trees within the registered use scope, Dimethoate is often the more appropriate choice. Monocrotophos is reserved for severe infestations on ornamentals where its higher systemic potency is needed.

    What is frass and why does it matter for stem borer diagnosis?

    Frass is the by-product of a stem borer larva’s internal feeding — a mix of chewed plant fibre, excrement, and bore dust ejected from the tunnel through the entry hole. Its appearance is like fine sawdust or coffee grounds, sometimes mixed with dark pellets. Frass is significant because it is the earliest visible external sign of borer activity — often appearing before any wilting or structural damage is visible. Regular inspection of stem bases and branch forks for frass is the most effective early detection method.

    My large mango tree has stem borers — can I treat it myself?

    For large fruit trees with extensive borer infestations in the trunk or primary branches, professional pest control is strongly recommended. Home-garden hand sprayers cannot achieve the application volume needed for full systemic coverage of a large tree. Additionally, tall tree application creates significant personal exposure risk. A licensed pest control professional has access to high-volume sprayers, canopy application equipment, and the appropriate personal protective equipment for high-toxicity systemic treatments on large trees.

    How do I prevent borers from attacking my plants next season?

    The most effective prevention is timed systemic sprays during adult moth/beetle egg-laying periods — typically at monsoon onset (June–July) and again in October-November across most of India. Apply Dimethoate 30% EC (Tafgor) or another registered systemic at label rate to your high-risk plants during these windows. Additionally: seal all pruning wounds with copper paste, remove dead wood promptly, maintain plant vigour through balanced watering and fertilisation, and inspect stem bases monthly for early frass signs.

    Conclusion: See the Signs Early, Act from the Inside Out

    Stem borers are among the most frustrating pests in Indian home gardens precisely because their damage is largely invisible until it is severe. A plant can look completely healthy from the outside while a larva systematically dismantles its vascular system from within — and then appear to collapse overnight with no apparent cause.

    The keys to successful management are: recognising frass and entry holes before structural damage occurs, confirming the diagnosis with a stem cut before any chemical application, removing infested material physically and immediately, and then — for persistent or severe infestations on non-edible ornamentals — applying a true systemic insecticide like Monocil 36% SL (Monocrotophos 36% SL) that follows the larva into its protected tunnel through the plant’s own sap. For food crop applications within the registered scope, TATA Tafgor (Dimethoate 30% EC) provides systemic action with a better safety profile for use around edible plants.

    Buy TATA Tafgor (Dimethoate 30% EC)

  • How to Measure 2 ml Per Litre of Pesticide Without Professional Tools

    How to Measure 2 ml Per Litre of Pesticide Without Professional Tools

    TL;DR — Accurate Pesticide Measurement Without Lab Equipment

    • Most home garden pesticides are dosed at 1–2 ml per litre (liquids like Dimethoate, Chlorpyriphos EC) or 1–2 g per litre (powders like Mancozeb WP, Carbendazim).
    • The most accurate low-cost tool is a 5 ml disposable syringe (no needle, available at any pharmacy for ₹10–30). Draw to the 2 ml graduation mark — done.
    • For powders, use a digital kitchen scale once to calibrate a dedicated spoon — then use that spoon as your reference every time.
    • Never guess by eye. Overdosing burns leaves (phytotoxicity) and increases health risk. Underdosing fails to control pests and builds chemical resistance.
    • Keep all measuring tools labelled “Pesticide Use Only” and stored with your garden chemicals — never in the kitchen.

    Why Does Accurate Pesticide Measurement Matter for a Home Garden?

    When a pesticide label says “2 ml per litre”, that number is the result of field trials, toxicology studies, and regulatory review. It is the dose that controls the target pest — no more, no less. Deviating from it has two equally harmful outcomes:

    • Underdosing: The active ingredient concentration is too low to kill the target pest effectively. Survivors are exposed to sub-lethal doses — the exact condition that accelerates resistance development. You will find yourself spraying more often, spending more money, and getting progressively worse results. This is how resistant populations of pests develop in home gardens.
    • Overdosing: Excess active ingredient causes phytotoxicity — chemical burn damage to leaves appearing as brown tips, scorched patches, yellow margins, or complete leaf death. For edible crops, overdosing extends the residue presence beyond the safe pre-harvest interval (PHI), meaning you cannot safely eat the produce on schedule. For the gardener, higher concentrations mean higher personal exposure during mixing and spraying.

    The good news: achieving an accurate 2 ml/L measurement does not require a calibrated measuring cylinder or a lab scale. It requires only a ₹20 pharmacist purchase and this guide.

    How to Measure 2 ml Per Litre Using a 5 ml Syringe

    A 5 ml disposable syringe without a needle is the most accurate, cheapest, and easiest measuring tool available to home gardeners. It is available at every pharmacy and medical supply shop in India, costs ₹10–30 per pack of 5, and has clear graduation markings in 0.2 ml increments — more precise than any household spoon or cap.

    Step-by-Step: Measuring Liquid Pesticides with a Syringe

    1. Put on gloves before handling the pesticide bottle.
    2. Hold the syringe vertically with the tip pointing up. Draw back the plunger slightly to confirm it moves freely.
    3. Insert the syringe tip into the liquid in the product bottle (or use a small pouring cap if the bottle opening is wide).
    4. Draw the plunger back slowly until the liquid level in the syringe reaches the 2 ml graduation line — the second mark from the tip on a standard 5 ml syringe.
    5. Hold it to eye level and check — the bottom of the liquid meniscus (the curved surface) should sit exactly on the 2 ml line.
    6. Transfer the measured volume into a mixing bucket or half-filled sprayer tank.
    7. Rinse the syringe immediately after use with clean water. Store separately from medical/food use items — labelled “Pesticide Use Only”.
    📐 Scaling Up: Dose Reference for Common Tank Sizes

    Tank/Bottle Size Water Volume Dose at 1 ml/L Dose at 2 ml/L Syringe Draws (5 ml)
    Hand pump sprayer 1 litre 1 ml 2 ml Draw to 2 ml mark once
    Small garden sprayer 2 litres 2 ml 4 ml Draw to 2 ml mark twice
    Medium sprayer 5 litres 5 ml 10 ml Two full 5 ml draws
    Knapsack sprayer 15 litres 15 ml 30 ml Six full 5 ml draws

    How to Measure Pesticide Using a Bottle Cap (Without a Syringe)

    If you do not have a syringe immediately available, a clean plastic bottle cap is the next best option. The key step is calibrating it once using a known reference.

    Step-by-Step: Calibrate and Use a Bottle Cap

    1. Select a clean, dry plastic cap — from a 1-litre water bottle (typically holds 5 ml when filled level) or a soft drink bottle.
    2. One-time calibration: Fill the cap with clean water, level it off, then pour into a measuring syringe or marked glass. Note how many ml the cap holds when level. Write this on the cap with a permanent marker (e.g., “CAP = 4 ml”).
    3. For a 2 ml dose from a 4 ml cap: fill the cap to the halfway mark.
    4. For a 2 ml dose from a 5 ml cap: fill to just below the halfway mark — approximately 40% full.
    5. Pour the measured cap volume into the mixing tank. Rinse cap with the tank water immediately.
    ⚠️ Cap Method Limitations

    The bottle cap method introduces a ±0.5 ml error margin at 2 ml — a 25% deviation either way. This is acceptable for ornamental plants where exact dosing is less critical, but not recommended for edible crops where PHI compliance requires consistent, precise dosing. For chilli, tomato, lemon, or any crop you consume — invest in a syringe.

    How to Measure 2 g Per Litre for Powder Pesticides (Mancozeb, SAAF, Plantomycin)

    Wettable powder (WP), soluble powder (SP), and water-dispersible granule (WG) formulations — like Indofil M-45 (Mancozeb 75% WP), UPL SAAF (Carbendazim 12% + Mancozeb 63% WP), and Aries Plantomycin (Streptomycin + Tetracycline) — are dosed by weight in grams, not volume in ml. Scooping a teaspoon looks consistent but is wildly variable because powder density changes with how the tin was stored, packed, or settled.

    The One-Time Spoon Calibration Method

    1. Borrow or purchase a small digital kitchen scale that reads to 0.1 g accuracy (available for ₹300–600 online).
    2. Place a clean, dry spoon on the scale and zero/tare the scale so it reads 0.0 g.
    3. Add the specific powder (e.g., Mancozeb 75% WP from Indofil M-45) to the spoon — gently, tap the spoon to settle it — until the scale reads exactly 2.0 g.
    4. Observe carefully: is the spoon heaped, level, or partly full? Note what it looks like with a written description (e.g., “level quarter teaspoon for Mancozeb”) or take a photograph.
    5. Use this visual reference every time you mix that specific product — the same powder, same spoon, same fill level = approximately 2 g.
    6. Repeat this calibration for each different powder product — densities vary significantly between Mancozeb, Carbendazim, Copper Oxychloride, and Streptomycin formulations.
    💡 Why Powder Density Makes Volume Measurements Unreliable

    A level teaspoon of fine-ground Mancozeb 75% WP weighs approximately 2–2.5 g. But a level teaspoon of coarser-ground Copper Oxychloride 50% WP (like in TATA Blitox) may weigh 3–4 g — a 50–100% overdose using the same spoon and “fill level”. Always calibrate each product independently with a scale. Never assume “one teaspoon = 2 g” across all powders.

    Complete Measurement Method Comparison: Which Tool to Use When

    Tool Best For 2 ml dose 2 g dose (powder) Cost Accuracy
    5 ml syringe (no needle) All liquid EC/SL products Draw to 2 ml graduation mark Not applicable ₹10–30 per pack ⭐⭐⭐⭐⭐ Best
    Digital scale All powder WP/SP/WG products Not applicable Weigh directly to 2.0 g ₹300–600 ⭐⭐⭐⭐⭐ Best
    Calibrated bottle cap Liquids when no syringe available Half of a calibrated 4 ml cap Not recommended Free (reused) ⭐⭐⭐ ±25% error
    Calibrated spoon Powders when no scale available Not recommended Use scale once to set reference Free (reused) ⭐⭐ ±30–50% error
    Guessing by eye N/A — never acceptable ❌ Do not use ❌ Do not use ❌ Unacceptable

    Worked Example: Mixing TATA Tafgor at 2 ml/L for a 5-Litre Garden Sprayer

    Here is a complete calculation and mixing walkthrough using TATA Tafgor (Dimethoate 30% EC) as the reference product. Always verify the current label dose on your pack — this example uses a typical ornamental garden rate:

    1. Determine your tank volume: 5-litre knapsack/pump sprayer = 5 litres of water required.
    2. Calculate the total dose: Label says 2 ml per litre × 5 litres = 10 ml of TATA Tafgor total.
    3. Using a 5 ml syringe: Draw the plunger to the 5 ml mark twice. That is 2 full syringe draws = 10 ml. Pour both into the mixing tank.
    4. Alternatively with a cap: If your calibrated cap holds 5 ml — use 2 full level caps = 10 ml. Pour both into the tank.
    5. Add to the half-filled tank: Your sprayer should already have approximately 2.5 litres of water. Add the measured Tafgor to this water (not the reverse).
    6. Top up to 5 litres and agitate: Add the remaining 2.5 litres of water and shake or stir the tank well before spraying.

    Buy TATA Tafgor (Dimethoate 30% EC)

    How to Prevent Leaf Burn from Pesticide Overdosing

    Phytotoxicity (pesticide-induced leaf burn) is the most visible consequence of overdosing and is more likely under specific conditions. Know the risk factors and avoid them:

    Risk Factor Why It Causes Leaf Burn Prevention
    Dose per litre too high Excess active ingredient denatures leaf proteins and cell membranes on contact Use syringe or scale; never guess
    Spraying in midday heat (>35°C) High temperatures increase leaf cuticle permeability and speed up absorption to toxic levels Spray before 9 AM or after 5 PM
    Plant already drought-stressed Stressed stomata are more open; chemical absorption is higher and more rapid Water plants 24 hours before spraying
    Incompatible tank mix Some combinations raise effective concentration or create new phytotoxic compounds Always test 50 ml tank mix before full application
    Spray droplet too fine (mist setting) Fine mists deposit more chemical per cm² of leaf surface than coarse drops Use a medium or coarse spray nozzle setting
    🧪 Always Do a Patch Test on New Products or Combinations

    Before treating all your plants with a new product or a new tank mix, spray 2–3 leaves on one plant at the intended rate and wait 48 hours. If no leaf burn, yellowing, or wilting appears, proceed with the full application. This 48-hour patch test costs nothing and prevents the scenario of burning an entire garden due to an incompatible mix or formulation error.

    How to Label and Store Your Measuring Tools

    Measuring tools that contact pesticide concentrates must be treated as hazardous items — even after washing:

    • Immediately after use: Rinse syringe or cap three times with clean water. Empty rinse water into the garden soil (away from food crops), not down drains.
    • Label every tool permanently: Use a waterproof permanent marker to write “PESTICIDE ONLY — DO NOT USE FOR FOOD OR MEDICINE” on each syringe, cap, spoon, and scale used for garden chemicals.
    • Store with your garden chemicals: Keep measuring tools in your locked pesticide storage cabinet — not in the kitchen drawer, bathroom, or medicine box.
    • Replace syringes periodically: Disposable syringes that have been used for organophosphate concentrates (Dimethoate, Chlorpyriphos) should be replaced every 10–15 uses or if the graduation markings wear away. The cost of ₹5–10 per syringe is irrelevant compared to the cost of a misdosed application.
    • Never share tools between households without re-labelling and cleaning — unlabelled measuring tools are a safety risk in any household.

    Safety When Measuring and Mixing Concentrated Pesticides

    ⚠️ Safety Protocols for Measuring and Mixing Concentrated Garden Pesticides

    • PPE before opening any bottle: Chemical-resistant rubber or nitrile gloves and a mask must be on before uncapping a pesticide concentrate. The highest exposure moment is the first pour from a concentrate bottle.
    • Ventilation: Always measure and mix outdoors or in well-ventilated spaces. Never in kitchens, bathrooms, or closed rooms. Organophosphate ECs (Tafgor, Lethal) and pyrethroid ECs release vapour during measurement.
    • Eye protection: Wear safety goggles or wrap-around glasses when measuring liquids — splashing concentrate into eyes is a medical emergency. Rinse eyes for 15–20 minutes with clean water if this occurs and seek medical attention.
    • Children and pets: Remove from the area before opening any product. Keep them away from mixing area and treated plants for 24–48 hours after spraying.
    • Measuring tools are hazardous items: A syringe, spoon, or cap that has contacted pesticide concentrate is contaminated. Never use for food, medicine, or children’s use. Label and store with chemicals.
    • Accidental ingestion: If pesticide concentrate is accidentally ingested, do not induce vomiting. Call 1800-11-6117 (National Poison Control, toll-free) or go to emergency immediately. Take the original product label with you.
    • Rinse tools, not drains: Rinse measuring tools with water and pour rinse water into garden soil away from edible crops, water sources, and drains.

    Common AgriHome Products and Their Standard Dosing Rates

    Use this as a quick reference for the products you are most likely to measure. Always verify on your specific product label — formulations can vary between batches and pack sizes:

    Product Active Ingredient Type Typical Home Garden Rate Best Measuring Tool
    TATA Tafgor Dimethoate 30% EC Liquid (EC) 1–2 ml per litre 5 ml syringe
    Lethal Chlorpyriphos 20% EC Liquid (EC) 2–2.5 ml per litre 5 ml syringe
    UPL SAAF Carbendazim 12% + Mancozeb 63% WP Powder (WP) 2 g per litre Digital scale → calibrated spoon
    Indofil M-45 Mancozeb 75% WP Powder (WP) 2–2.5 g per litre Digital scale → calibrated spoon

    Buy TATA Tafgor (Dimethoate 30% EC)
    Buy Lethal (Chlorpyriphos 20% EC)
    Buy UPL SAAF (Carbendazim + Mancozeb)
    Buy Indofil M-45 (Mancozeb 75% WP)

    Frequently Asked Questions About Pesticide Measurement at Home

    Can I use a regular kitchen measuring spoon to measure 2 ml of Dimethoate?

    No — not accurately. The smallest standard kitchen measuring spoon is typically 1.25 ml or 2.5 ml (¼ or ½ teaspoon), and surface tension with oily EC formulations like Dimethoate 30% EC means the actual measured volume is hard to read precisely. A 5 ml disposable syringe costs ₹10–30 and gives a clean, accurate 2 ml reading every time. It is the correct tool for this purpose and should be purchased specifically for garden chemical use.

    How do I measure half a millilitre (0.5 ml) if my label says 0.5 ml per litre?

    A 5 ml syringe has graduation marks at 0.2 ml intervals — the 0.5 ml mark is the second smallest mark from the tip. Draw the plunger back until the liquid level sits at that mark. For very small doses (below 0.5 ml per litre) with small volumes of water, consider using a 1 ml or 2 ml syringe instead for easier reading — these are also available at pharmacies for ₹5–10.

    Does the type of water (tap, filtered, bore well) affect the dose?

    Tap and filtered water work equally well for mixing most pesticides. However, highly alkaline water (bore well water with pH above 8.5, common in parts of Rajasthan, Gujarat, and interior Maharashtra) can accelerate the breakdown of organophosphates like Dimethoate through alkaline hydrolysis — reducing the effective dose in the tank over time. If you suspect very alkaline water, adjust pH to 6–7 by adding a small amount of food-grade citric acid or a commercial spray buffer before mixing the pesticide.

    I accidentally added too much pesticide to the tank — what should I do?

    If you have added, say, 20 ml to a 5-litre tank (4 ml/L instead of the recommended 2 ml/L), do not spray it. Add an additional 5 litres of water to dilute the mix back to the correct concentration (you now have 10 litres at 2 ml/L). If you cannot carry 10 litres, carefully pour out half the over-concentrated mix into a sealed container, then top both halves up to the correct volume separately. Never spray an over-concentrated solution — the risk of phytotoxicity and personal exposure is not worth it.

    How long can I store a pre-mixed pesticide solution if I have some left over?

    Most mixed pesticide solutions should be used within 24 hours of mixing and stored in the sealed, labelled sprayer tank in a cool shaded location. Do not store mixed solutions for more than 24 hours — most ECs and WP formulations begin to separate, settle, or degrade when diluted, and the concentration becomes unpredictable. Leftover solution after 24 hours should be applied at a diluted rate to ornamental soil (not edible crop beds) or disposed of per label guidance.

    Conclusion: A ₹20 Investment That Makes Every Spray Session More Effective

    The single most impactful improvement an Indian home gardener can make to their pest and disease management routine costs less than a cup of chai. A 5 ml disposable syringe from the pharmacy and one session with a digital scale to calibrate a dedicated powder spoon transforms guesswork into precision — and precision into results.

    Products like TATA Tafgor (Dimethoate 30% EC), Lethal (Chlorpyriphos 20% EC), UPL SAAF, and Indofil M-45 (Mancozeb 75% WP) are formulated to work at specific concentrations. Give them the correct dose and they will deliver the result on the label. Under-measure and pests survive. Over-measure and your plants pay the price. Measure correctly, and your garden thrives.

  • Pesticide Safety 101: How to Mix & Spray at Home

    Pesticide Safety 101: How to Mix & Spray at Home

    TL;DR — The 5 Golden Rules of Safe Pesticide Use at Home

    • Read the label first — every product has a specific target crop, dose, spray interval, and pre-harvest interval (PHI). No guessing.
    • Wear PPE every time — gloves, mask, long sleeves, and closed shoes. Not optional, even for a “quick spray”.
    • Never spray against the wind — always stand upwind so the spray drifts away from you.
    • Keep chemicals in original packaging — never transfer into unlabelled bottles, drink containers, or food jars.
    • Wash yourself and your tools after every session — skin, face, sprayer, and mixing equipment.

    Why Does Pesticide Safety Matter Even in a Small Home Garden?

    Many Indian home gardeners assume that pesticide safety protocols apply only to commercial farmers handling large quantities of chemicals. In reality, the risk profile in a small balcony or kitchen garden can be higher — not lower — than on a farm:

    • Physical proximity: Home sprayers are typically 30–50 cm from the plants being treated, meaning greater personal exposure than a tractor-mounted boom sprayer. Spray drift lands directly on the gardener.
    • Children and pets: Home gardens are shared spaces. Products like Dimethoate 30% EC (TATA Tafgor), Chlorpyriphos 20% EC (Lethal), and pyrethroid-based insecticides are acutely toxic to children, cats, and dogs at much lower doses than to adults.
    • Edible crops in close quarters: A balcony garden may have hibiscus next to chilli next to mint. A pesticide applied to an ornamental can drift or drip onto edible crops, creating unintended dietary exposure.
    • Misuse risk: Without a label or professional guidance, home gardeners frequently overdose (burning leaves and increasing health risk) or underdose (allowing pests to develop resistance).

    The good news: following a small set of consistent rules allows you to safely use professional-grade products like Lethal Chlorpyriphos 20% EC, TATA Tafgor (Dimethoate 30% EC), UPL SAAF (Carbendazim 12% + Mancozeb 63% WP), and Indofil M-45 (Mancozeb 75% WP) in your home and terrace garden — effectively, safely, and without harm to your family or environment.

    What Are the “Golden Rules” of Safe Pesticide Mixing and Spraying?

    📋 The 5 Golden Rules — Print and Keep Near Your Garden Storage

    1. Read the label before every use — even if you have used the product before. Labels carry dose, approved crops, PHI, first aid, and disposal instructions. The label is the law.
    2. Wear PPE every single time — gloves, face mask, eye protection, long clothing. No exceptions, even for a small spray job.
    3. Always stand upwind — position yourself so the spray moves away from your body. If you can smell the product strongly while spraying, you are absorbing it.
    4. Keep products in their original containers — original packaging has the label, child-warning icons, first aid information, and emergency contact numbers. A transferred product in an unlabelled bottle is a medical emergency waiting to happen.
    5. Clean up completely — every time — rinse the sprayer, wash your hands and face, and change clothes before re-entering living spaces or handling food.

    How to Read a Pesticide Label Before Use

    The product label is the most important safety document in your garden shed — and most home gardeners never fully read it. Here is what to check before measuring a single drop:

    Label Section What to Look For Why It Matters
    Target pests / diseases Listed insects, fungi, or bacteria the product is registered for Using a fungicide for a bacterial disease (or vice versa) wastes money and fails to treat the problem
    Approved crops Which vegetables, fruits, or ornamentals are on the label Some products are not registered for food crops — critical for edible gardens
    Dose (ml or g per litre) Exact volume or weight per litre of water Overdosing burns leaves; underdosing fails to control pests and encourages resistance
    Spray interval Minimum days between applications Spraying more frequently than specified increases residue and resistance risk
    Pre-Harvest Interval (PHI) Days to wait after last spray before harvesting and eating Non-negotiable for edible crops — consuming produce before PHI expires risks chemical ingestion
    First aid instructions What to do for skin, eye, inhalation, or ingestion exposure Critical information that must be accessible immediately in an emergency

    What PPE (Personal Protective Equipment) Do You Need for Home Garden Spraying?

    For most home garden applications of pesticides, insecticides, and fungicides, you need the following minimum PPE:

    • Gloves: Rubber or nitrile chemical-resistant gloves (not fabric garden gloves — liquid chemicals soak through fabric). Available at any hardware store for ₹50–150 per pair.
    • Face mask: At minimum, a cloth mask or surgical mask to prevent inhalation of fine spray mist. For organophosphates like Dimethoate (Tafgor) or Chlorpyriphos (Lethal), an N95/P2 mask provides better protection against fume inhalation.
    • Eye protection: Safety goggles or wrap-around sunglasses to prevent spray droplets from reaching eyes. Particularly important when spraying overhead or in wind.
    • Clothing: Long-sleeved shirt, full-length trousers, and closed, solid shoes (not sandals or flip-flops). Synthetic fabrics are easier to wash off than natural fibres for most pesticide formulations.
    💡 The “Quick Spray” Trap

    The most common cause of accidental pesticide exposure in home gardens is taking shortcuts for “just a small spray”. It only takes 30 seconds to put on gloves and a mask — but it takes days to weeks for organophosphate exposure symptoms to fully resolve. Treat every spray session, however brief, as requiring full PPE. No exceptions.

    How to Mix Pesticides Correctly at Home: Step-by-Step

    Correct mixing technique ensures accurate dosing, product stability, and safety. Follow this sequence for any liquid (EC/SL) or wettable powder (WP/SP) formulation:

    1. Choose your mixing area.
      Mix outdoors or in a well-ventilated covered area only. Keep mixing well away from children, pets, food, cooking areas, and drinking water supplies.
    2. Put on full PPE before opening the product.
      Gloves and mask go on before uncapping the bottle — not after. The highest exposure moment is often the initial opening and pour.
    3. Fill the sprayer tank or bucket halfway with clean water first.
      Never add water to concentrated chemical — always add chemical to water. This reduces the risk of splashing concentrated solution.
    4. Measure the pesticide accurately.
      Use a dedicated syringe (for liquids in ml) or digital kitchen scale (for powders in grams). Never estimate “by eye”. Measure into a small cup first, then pour into the tank — never pour directly from the product bottle into the tank without measuring.
    5. Add chemical to water, not water to chemical.
      Pour the measured product gently into the half-filled tank. Stir or swirl to disperse it.
    6. Top up with water to the final required volume.
      Stir or agitate well one more time before spraying. For WP formulations (like Mancozeb or SAAF), shake the sprayer tank every few minutes during application to prevent settling.
    7. Label your mixing container.
      If you prepare a tank and don’t use all of it immediately, write the product name and date on the tank with a marker. Never leave unmixed concentrate in ambiguous unlabelled containers.

    How to Spray Pesticides Safely in a Home Garden

    Before You Start Spraying

    • Check the wind direction — always position yourself upwind of the plants you are spraying.
    • Move children, pets, and birds (including caged birds) completely out of the area before starting. Do not spray near fish tanks or ornamental ponds.
    • Close windows and doors of adjacent living spaces to prevent spray drift indoors.
    • Check the weather — avoid spraying within 4 hours of expected rain (product washes off) or during wind gusts above 15 km/h.

    Timing Your Spray Sessions

    • Best window: Early morning (6–9 AM) or late evening (5–7 PM) — temperatures are lower, wind is typically calmer, and beneficial insects (bees) are less active.
    • Avoid: Midday during Indian summer heat above 35°C — hot leaves absorb chemicals unevenly and phytotoxicity risk increases significantly.
    • Avoid: Spraying directly on open flowers during daylight hours when bees are foraging — most insecticides are toxic to pollinators.

    While Spraying

    • Do not eat, drink, smoke, touch your face, or use your mobile phone during spraying.
    • Maintain a consistent distance from the plant — 30–50 cm for hand sprayers — and use a sweeping motion for even coverage.
    • Cover leaf undersides and stem joints, not just the visible top surface — most pests and fungal spores concentrate on undersides.
    • If the tank runs out mid-application, treat the unused area immediately after refilling — do not leave part of a plant untreated and return hours later.

    Immediately After Spraying

    • Triple-rinse the sprayer tank with clean water. Pour rinse water into a designated drain or an area away from vegetable beds, water sources, and play areas.
    • Wash both hands, forearms, and face thoroughly with soap and water.
    • Remove and wash all clothing worn during spraying before wearing again.
    • Store the sealed product in a cool, dry, locked location immediately.

    How to Measure 2 ml/L or 2 g/L Without Professional Tools

    Most home garden pesticides are dosed at 1–2 ml per litre (liquids) or 1–2 g per litre (powders). Here are practical measurement solutions for home gardeners:

    Tool How to Measure 2 ml (per 1 L) How to Measure 10 ml (per 5 L) Accuracy
    5 ml disposable syringe (without needle) Draw to the 2 ml graduation mark Two full 5 ml draws ⭐⭐⭐⭐⭐ Most accurate — recommended
    Digital kitchen scale For powders: zero the scale, weigh 2 g directly For powders: weigh 10 g directly ⭐⭐⭐⭐⭐ Most accurate for WP/SP powders
    Marked bottle cap (5 ml cap) Fill just under half a 5 ml cap Two full 5 ml caps ⭐⭐⭐ Acceptable approximation
    5 ml teaspoon (dedicated-only) Slightly under half a level teaspoon Two level teaspoons ⭐⭐ Volume ≠ weight for powders; use only as rough guide
    Guessing by eye ❌ Never acceptable — do not guess doses
    🛒 One-Time Purchase That Pays for Itself: Get a 5 ml Syringe

    A pack of 5 ml disposable syringes (without needle) costs ₹10–30 at any pharmacy. Label it “PESTICIDE USE ONLY” with a permanent marker and store it with your garden chemicals. It eliminates measurement guesswork for every liquid product you ever buy — Tafgor, Monocil, Lethal EC, and any future product. Never use the same syringe for medicine or food use.

    How to Store and Dispose of Pesticides Safely at Home

    Storage Rules

    • Store all pesticides in a cool, dry, well-ventilated location away from direct sunlight — heat and UV degrade most formulations and can cause pressure build-up in sealed containers.
    • Keep products in a locked cabinet or a dedicated shelf that children cannot access. A simple padlocked metal cabinet is ideal.
    • Store chemicals away from food, water, animal feed, and medicines — even closed containers can outgas trace fumes.
    • Always close caps tightly immediately after measuring — even partial evaporation of ECs (emulsifiable concentrates) like Tafgor or Lethal changes the concentration ratio.
    • Do not store products on very high shelves where accidental drops could cause spills and exposure.

    Disposal Rules

    • Never pour leftover diluted spray solution down kitchen or bathroom drains — organophosphates and pyrethoids are harmful to aquatic organisms in sewage systems.
    • Leftover diluted solution can be applied to non-edible ornamental soil in a diluted form — check the product label for guidance.
    • Empty pesticide containers should be triple-rinsed with water, then punctured or crushed to prevent reuse, and disposed of via local municipal solid waste following container disposal instructions on the label.
    • Never burn empty pesticide containers — combustion of organophosphates and pyrethroids releases toxic fumes.

    What to Do in Case of Accidental Pesticide Exposure

    Act immediately. Do not wait for symptoms to develop before taking action — many organophosphate and pyrethroid symptoms have a delay of 30–90 minutes between exposure and visible onset.

    Type of Exposure Immediate Action Medical Action
    Skin contact Remove contaminated clothing immediately. Wash affected skin with generous amounts of soap and water for at least 15 minutes. Seek medical advice if irritation, redness, or numbness persists after washing.
    Eye exposure Rinse eyes gently with a continuous stream of clean water for at least 15–20 minutes. Remove contact lenses if present before rinsing. See a doctor or go to emergency — even if eyes feel better after rinsing, chemical damage can be delayed.
    Inhalation Move the person to fresh air immediately. Loosen tight clothing. Rest in a seated, upright position. Call emergency services if breathing is difficult, the person is confused, or symptoms do not resolve within 10 minutes in fresh air.
    Ingestion Do NOT induce vomiting unless specifically directed by a doctor. Give water to drink if the person is conscious and alert. Call Poison Control or go to emergency immediately. Bring the original product label or bottle — medical staff need the active ingredient name for treatment.
    📞 Save This: India Poison Control Helplines

    • National Poison Information Centre (AIIMS, New Delhi): 1800-11-6117 (toll-free) or 011-26593677
    • Local Emergency: 112 (national emergency number)
    • Keep the original product label accessible — always bring it to the hospital. The active ingredient name determines treatment. “Pesticide” is not specific enough for medical staff.

    Complete Safe Spraying Checklist for Home Gardeners

    ⚠️ Complete Pesticide Safety Protocol — Home Garden Edition

    • Before you start: Read the full product label. Confirm the product is registered for your target pest and crop. Check the PHI for any edible plants in the area.
    • PPE: Chemical-resistant rubber or nitrile gloves, P2/N95 mask or respirator, wrap-around eye protection, long-sleeved shirt, full-length trousers, and closed shoes. All PPE on before opening the product.
    • Ventilation: Mix and spray outdoors or in well-ventilated spaces only. Never in enclosed rooms, kitchens, or near air intake vents.
    • Children and pets: Remove completely from the spray area before starting. Do not allow re-entry for at least 24–48 hours or until all surfaces are dry.
    • Wildlife and water: Keep products away from ponds, fish tanks, bird water bowls, and all drainage that leads to natural water bodies.
    • Pollinators: Spray early morning or evening only. Do not spray on flowering plants when pollinators are actively foraging.
    • Food crops: Strictly observe the pre-harvest interval (PHI) on the label before consuming any produce from treated plants.
    • After spraying: Triple-rinse the sprayer. Wash hands, face, and all skin with soap and water. Change clothes before entering living spaces or preparing food.
    • Storage: Sealed in original packaging, in a cool dry locked space, away from all food, water, medicines, and children.
    • Emergencies: Keep the product label accessible and take it to the hospital in case of accidental ingestion or severe exposure.

    Products Used in Indian Home Gardens — Shop Safely

    These are the professional-grade products referenced throughout this guide, available at AgriHome with full product labels and safety information:

    Buy TATA Tafgor (Dimethoate 30% EC)
    Buy Lethal (Chlorpyriphos 20% EC)
    Buy UPL SAAF (Carbendazim + Mancozeb)
    Buy Indofil M-45 (Mancozeb 75% WP)

    Frequently Asked Questions About Pesticide Safety for Home Gardens

    Can I mix two different pesticides in one sprayer tank?

    Tank-mixing is possible, but not all combinations are compatible or safe. Before mixing two products, check: (1) both product labels allow tank-mixing, (2) the products are from different chemical classes to reduce resistance risk, (3) conduct a small 50 ml compatibility test — if the mix separates, precipitates, or produces heat, do not use it. Never mix without confirming compatibility: some combinations can cause phytotoxicity or reduce the efficacy of both products.

    What happens if I accidentally overdose — use too much pesticide per litre?

    Overdosing causes two problems: phytotoxicity (chemical burn damage to leaves, appearing as brown tips, scorched patches, or complete leaf death) and increased chemical residue on edible crops, extending the safe eating interval. If you accidentally over-concentrate a mix and have already sprayed, flush the treated plants with clean water within 30 minutes of application if possible. Do not eat treated produce until at least double the standard PHI has elapsed.

    Do I need PPE for fungicides like SAAF or Indofil M-45, or just for insecticides?

    Yes, PPE is required for all pesticide categories — fungicides, insecticides, herbicides, and plant antibiotics. Fungicide wettable powders like Mancozeb 75% WP (Indofil M-45) and Carbendazim + Mancozeb (UPL SAAF) are fine airborne powders during mixing: inhalation of fungicide dust during the mixing stage poses a real respiratory risk. Gloves and a mask are non-negotiable even for fungicides.

    How long should I keep children and pets away after spraying?

    As a general rule, keep children and pets away for a minimum of 24–48 hours after application, or until all treated surfaces are completely dry to the touch. For organophosphate products like Dimethoate (Tafgor) or Chlorpyriphos (Lethal), the 48-hour minimum is strongly recommended due to their higher acute toxicity to children and cats. Always verify the specific re-entry interval on the product label — some products have shorter documented intervals.

    Can I pour leftover diluted spray solution down the sink or drain?

    No. Most insecticides (organophosphates, pyrethroids) and fungicides are harmful to aquatic invertebrates and fish at very low concentrations. Pour leftover spray solution onto a non-food patch of garden soil (not near water), or apply it to the ornamental plants it was intended for. Never pour down kitchen sinks, bathroom drains, stormwater grates, or anywhere that leads to natural waterways.

    Conclusion: Safe Gardeners Are Effective Gardeners

    Pesticide safety in a home garden is not about fear — it is about competence. Understanding what you are applying, why the label dose exists, and how to protect yourself and your family while applying it transforms you from a reactive sprayer into a skilled, responsible home gardener.

    The products available to Indian home gardeners today — Lethal Chlorpyriphos 20% EC, TATA Tafgor Dimethoate 30% EC, UPL SAAF, Indofil M-45 Mancozeb 75% WP — are genuinely professional-grade tools. Used correctly, with the right measurement, the right PPE, and the right timing, they are safe and highly effective. Used carelessly, any chemical — even water — becomes a hazard.

    Print this guide. Keep a 5 ml syringe in your garden kit. Store chemicals in a locked cabinet. Read every label. Those four habits alone will make your garden safer and your pest and disease control more effective season after season.

  • TATA Tafgor for Mealybugs on Hibiscus: The Systemic Fix That Actually Works

    TL;DR — The Systemic Fix for Hibiscus Mealybugs

    • Mealybugs hide deep inside hibiscus leaf axils and tender shoots — washing and contact sprays alone will not reach them, and infestations bounce back within weeks.
    • TATA Tafgor (Dimethoate 30% EC) is a systemic organophosphate insecticide that is absorbed by the plant and moves through its sap. When mealybugs feed, they ingest the active ingredient and die — regardless of where they are hiding.
    • The most effective routine combines pruning → water washing → Tafgor spray → ant control, repeated once at 7–10 days.
    • Always respect the pre-harvest interval (PHI) if treating edible plants such as lemon or chilli alongside hibiscus.

    Why Do Hibiscus Plants Get Mealybugs So Often in Indian Gardens?

    Hibiscus rosa-sinensis is one of the most popular flowering plants in Indian home gardens — and one of the most reliably colonised by mealybugs (Planococcus citri and Pseudococcus spp.). The combination of soft, continuously flushing new growth, dense branching architecture, and humid conditions makes hibiscus an ideal permanent host.

    Three factors specific to Indian balcony and terrace gardens make the problem worse:

    • Overcrowded pots with dense overlapping foliage create sheltered micro-environments where mealybugs breed undisturbed and humidity stays high.
    • Ants actively protect mealybug colonies from natural predators like ladybirds and parasitic wasps, in exchange for the sweet honeydew mealybugs excrete. Without ant control, mealybug populations recover rapidly after spraying.
    • Year-round warm temperatures in most Indian regions mean there is no cold-season die-off — mealybug populations cycle continuously without the natural suppression seen in temperate climates.

    How to Spot a Mealybug Infestation on Hibiscus

    • White, cottony waxy clusters at leaf axils (where leaf meets stem), inside new buds, and along the main stem.
    • Sticky honeydew coating leaves below the infestation — a visible, tacky residue that catches dust and debris.
    • Black sooty mould (Capnodium spp.) growing on honeydew, turning leaves grey-black and reducing photosynthesis.
    • Ants running purposefully up and down the stem — a reliable indicator that a mealybug or aphid colony is being “farmed”.
    • Flower buds dropping before opening, or flowers that open small and distorted.

    Why Is Simple Washing Not Enough for Heavy Hibiscus Mealybug Infestations?

    Water-jet washing and manual wiping with alcohol-soaked cotton are valuable first steps — but they have critical limitations against established mealybug colonies on hibiscus:

    Control Method What It Does What It Misses Verdict
    Water-jet washing Dislodges exposed surface colonies Insects deep in axils, inside buds, on roots ✅ Good first step, ❌ insufficient alone
    Alcohol/cotton wipe Kills mealybugs on contact; removes wax Impossible to reach all axils; misses eggs ✅ Useful for spot treatment of single stems
    Neem oil spray (contact) Smothers soft-bodied insects on contact Hidden insects; eggs under wax; root mealybugs ✅ Good for light infestations only
    Contact insecticide spray Kills insects the spray physically hits All insects not directly contacted ❌ Poor coverage inside dense hibiscus structure
    TATA Tafgor (Dimethoate 30% EC) Absorbed into plant sap; kills pests when they feed Nothing — reaches hidden insects systemically ✅ Most effective for heavy/recurring infestations

    For heavy, recurring mealybug problems, you need something that reaches inside the plant — not just the surface. That is where TATA Tafgor’s systemic action becomes the decisive difference.

    How Does TATA Tafgor (Dimethoate 30% EC) Kill Mealybugs on Hibiscus?

    TATA Tafgor contains Dimethoate 30% EC — an organophosphate systemic insecticide formulated as an emulsifiable concentrate. Its mechanism is fundamentally different from surface sprays:

    1. After foliar application, Dimethoate is absorbed through the leaf cuticle and stomata within 1–2 hours under normal temperature conditions.
    2. The active molecule moves systemically through the plant’s phloem (the sap-conducting tissue) — the exact nutrient stream that mealybugs, aphids, and other sap-suckers tap into with their piercing mouthparts.
    3. When mealybugs feed, they ingest Dimethoate along with the sap. Dimethoate inhibits the enzyme acetylcholinesterase in the insect’s nervous system, causing rapid paralysis and death within hours to 2 days of feeding.
    4. Because the active ingredient is distributed throughout the plant’s conducting tissue, mealybugs hiding inside unopened buds, packed tightly into leaf axils, or sheltering inside stem folds are equally exposed — spray coverage of the insect’s exact location is not required.
    💡 Why Systemic Action Changes Everything for Hibiscus

    A dense, well-branched hibiscus plant in a home garden can have hundreds of leaf axils — it is physically impossible to achieve direct spray contact with every mealybug colony using a hand sprayer. TATA Tafgor bypasses this problem entirely: spray the leaves, let the plant absorb it, and let every feeding mealybug expose itself to the active ingredient through the plant’s own sap.

    Buy TATA Tafgor (Dimethoate 30% EC)

    The “Sunday Morning” Hibiscus Mealybug Treatment Routine

    Set aside 45–60 minutes on a weekend morning for this full treatment sequence. Done properly, two rounds of this routine — 7–10 days apart — will bring even heavy hibiscus mealybug infestations under control.

    Stage 1: Prune and Clean (15 minutes)

    1. Put on gloves before handling the plant — mealybug honeydew is sticky and can spread insects to other plants via your hands.
    2. Remove all heavily infested shoots, buds, and leaves using clean pruning shears or scissors. Cut back to clean, uninfested tissue.
    3. Cut back weak, crowded internal branches to open the canopy — better airflow reduces the sheltered micro-environment mealybugs prefer.
    4. Seal all removed material in a plastic bag immediately and dispose of it. Do not compost — mealybugs on pruned material remain alive for several days and will reinfest nearby plants.

    Stage 2: Water Wash (10 minutes)

    1. Use a garden hose or a 1-litre bottle with a spray nozzle set to a firm, focused jet — not a mist.
    2. Direct the jet at remaining mealybug clusters on stems and leaf undersides, dislodging as many as possible.
    3. Focus particularly on leaf axils and stem joints — rotate the plant if needed to access all angles.
    4. Allow the plant to drip dry for 5–10 minutes before spraying Tafgor — a very wet leaf surface dilutes the spray solution.

    Stage 3: Mix and Apply TATA Tafgor (15 minutes)

    1. Put on gloves and a mask before opening the Tafgor bottle.
    2. Measure the label-recommended dose of TATA Tafgor (Dimethoate 30% EC) — typically 1–2 ml per litre of water for foliar application on ornamentals. Always verify on your specific pack.
    3. Add the measured Tafgor to a half-filled sprayer tank, then top up with water and agitate well.
    4. Spray thoroughly over all plant surfaces — leaf tops, undersides, stems, and the soil surface around the base (for root-zone mealybugs).
    5. Spray in early morning (before 9 AM) or evening (after 5 PM). Avoid mid-day application in Indian summer heat — temperatures above 35°C increase phytotoxicity risk.

    Stage 4: Control the Ants (10 minutes)

    1. Identify the ant entry route to your hibiscus — usually via the pot rim, a wall junction, or a branch touching an adjacent surface.
    2. Trim any branches touching walls, railings, or other pots to eliminate physical bridges.
    3. Apply a sticky barrier product or petroleum jelly band around the pot exterior, just below the rim, to prevent ants climbing up through the soil.
    4. Without removing ants, a new mealybug colony will re-establish within 2–4 weeks of treatment.

    Stage 5: Follow-Up Check and Second Spray

    • Inspect the plant after 7–10 days. Look at leaf axils and new shoot bases with good light — a small torch helps.
    • If you spot new mealybug activity, repeat Stages 2–4 once more.
    • Do not repeat more than the maximum number of applications stated on the current product label per season.
    • After two rounds, most heavy infestations are brought under control. Continue monthly monitoring to catch any recurrence early.
    📅 Spray Timing Cheat Sheet

    • Best time: Early morning (6–9 AM) or evening (5–7 PM)
    • Avoid: Midday when temperature exceeds 35°C
    • Avoid: When rain is forecast within 4 hours (product washes off before absorption)
    • Avoid: When bees are actively foraging on open flowers
    • Repeat interval: 7–10 days between applications, not sooner

    How to Stop Mealybugs from Returning to Your Hibiscus

    Treating an active infestation is only half the job. Preventing re-establishment requires changing the conditions that made your hibiscus attractive in the first place:

    • Pot size matters: A hibiscus in a pot that is too small becomes root-bound and stressed — stressed plants have weaker defences against pest pressure. Repot into a container at least 30–35 cm in diameter with good drainage.
    • Avoid excessive nitrogen: High-nitrogen fertilisers (urea, ammonium nitrate) push out very soft, lush growth — exactly what mealybugs prefer. Use a balanced NPK fertiliser (10:10:10) or switch to a potassium-rich feed during peak flowering.
    • Inspect new plants before introducing them: Mealybugs spread easily from newly purchased plants. Quarantine any new hibiscus or ornamental plant for 1–2 weeks before placing it near existing plants.
    • Regular fortnightly inspection: Check leaf axils and shoot bases every two weeks. A colony caught at 5–10 individuals can be wiped out manually; a colony of 500+ requires chemical intervention.
    • Encourage natural predators: Ladybirds (Coccinellidae) and lacewing larvae (Chrysopidae) are voracious mealybug predators. Reducing broad-spectrum insecticide use to targeted applications only (not routine spraying) allows these populations to establish in your garden.

    Safety When Using TATA Tafgor on Hibiscus

    ⚠️ Safety Protocols — Dimethoate 30% EC (TATA Tafgor)

    • PPE: Always wear chemical-resistant rubber gloves, a P2/N95 mask or respirator, and safety goggles when measuring, mixing, and spraying. Wear long sleeves and closed shoes. Wash all exposed skin thoroughly with soap and water immediately after use.
    • Ventilation: Mix and apply in open, well-ventilated outdoor spaces only. Dimethoate is an organophosphate — never handle in enclosed spaces, kitchens, or indoors.
    • Pet & children safety: Keep children, pets, and birds out of the spray area for a minimum of 24–48 hours post-application, or until all plant surfaces are visibly dry.
    • Edible crops: If treating lemon, chilli, or any other edible plant alongside hibiscus, strictly observe the pre-harvest interval (PHI) printed on the current product label before harvesting and consuming any produce.
    • Fish and aquatic life: Dimethoate is toxic to fish. Do not spray near fish tanks, outdoor ponds, or drains that lead to water bodies. Triple-rinse the empty container and keep rinse water away from drains.
    • Pollinator safety: Dimethoate is harmful to bees. Do not spray during active flowering or when bees are foraging. Remove open flowers before spraying if possible, or spray only in early morning before bee activity starts.
    • Storage: Keep in original sealed packaging in a cool, dry, locked area away from food, water, and the reach of children. Do not store near heat sources.

    Frequently Asked Questions About Using TATA Tafgor on Hibiscus

    How much TATA Tafgor should I mix for one hibiscus plant?

    For a single hibiscus plant in a home garden, a 1-litre hand sprayer is usually sufficient per application. Mix 1–2 ml of TATA Tafgor (Dimethoate 30% EC) per litre of water — this is the standard ornamental foliar rate, but always verify on your specific pack as label doses can vary between product batches. Use the full litre to ensure thorough stem, leaf, and soil-surface coverage.

    How long does TATA Tafgor take to kill mealybugs on hibiscus?

    After application, Dimethoate is absorbed into plant tissue within 1–2 hours under normal warm Indian temperatures. Mealybugs that were actively feeding at the time of application show paralysis and die within 24–48 hours. Insects that were not feeding at the time of application (resting or in egg stage) will be exposed when they resume feeding, so complete colony knock-down typically takes 3–5 days after a well-applied spray.

    Can I use TATA Tafgor on hibiscus in a flowering pot?

    Use Tafgor on hibiscus with open flowers only when bees are not foraging — spray in early morning before 8 AM or in the evening. Ideally, remove or deadhead open blooms before spraying to protect any visiting pollinators. The systemic action of Dimethoate means you do not need to spray directly onto buds — treating leaves and stems provides full coverage through the plant’s sap system.

    My hibiscus had mealybugs, I sprayed Tafgor, but they returned within a month. Why?

    Rapid rebound after Tafgor treatment is almost always caused by ants re-establishing mealybug colonies from uncontrolled populations in adjacent pots, soil, or wall crevices. Tafgor eliminates the insecticide-exposed colony — but ants can introduce a new mealybug colony from a nearby source within 2–4 weeks. The fix is to treat the infestation AND simultaneously break all ant access routes to the plant before and after spraying.

    Is TATA Tafgor safe to spray near children’s play areas?

    No spray application should occur in active play areas. Keep children out of the spray zone for a minimum of 48 hours after application, or until all plant surfaces are completely dry and any residual odour has dissipated. If your hibiscus is in a shared outdoor space, choose an early morning spray slot (before children are active) and ensure the area is well-ventilated and surfaces are dry before allowing access.

    Conclusion: Two Well-Timed Sprays Can Save Your Hibiscus

    Mealybugs on hibiscus are not a cosmetic nuisance — left untreated, a heavy infestation will suppress flowering completely, stunt new growth, and eventually weaken the plant to the point of collapse. The challenge is that the most common responses — washing with water, wiping with alcohol, or applying a contact spray — are not designed to reach insects hiding in the architectural complexity of a well-branched hibiscus.

    TATA Tafgor (Dimethoate 30% EC) changes the equation by putting the active ingredient inside the plant itself. Two well-timed sprays, 7–10 days apart, combined with pruning, washing, and consistent ant control, is the treatment protocol that reliably brings even heavy mealybug populations under control. Follow the safety protocols, respect label doses and intervals, and your hibiscus can return to healthy, abundant flowering within 3–4 weeks.

    Buy TATA Tafgor (Dimethoate 30% EC)

  • Identifying Sucking Pests: Mealybugs, Aphids & Thrips

    Identifying Sucking Pests: Mealybugs, Aphids & Thrips

    TL;DR — Why Your Plants Are Sticky, Curly and Not Flowering

    • If your hibiscus, lemon, or indoor plants have curled leaves, sticky surfaces (honeydew), and poor flowering, the most likely culprits are sap-sucking pests: mealybugs, aphids, or thrips.
    • Each pest looks and behaves differently — correct identification determines whether a contact spray or a systemic insecticide will work.
    • TATA Tafgor (Dimethoate 30% EC) is a systemic insecticide absorbed into plant sap — it reaches hidden pests that contact sprays miss entirely.
    • Sentry (Lambda-Cyhalothrin) is a broad-spectrum contact insecticide useful for knocking down visible, mixed pest populations on ornamentals.
    • Chemical control works best when combined with pruning, water-washing, and ant control — ants actively protect and spread mealybugs and aphids.

    Why Are Sap-Sucking Pests the #1 Pest Problem in Indian Home Gardens?

    India’s warm, humid climate — from coastal Maharashtra to the Gangetic plains — creates near-ideal breeding conditions for sap-sucking insects year-round. Unlike leaf-chewing caterpillars or borers that cause visible physical damage, sucking pests operate silently, draining plant energy from the inside out before most gardeners notice anything is wrong.

    Three structural features of typical Indian home gardens make infestations worse:

    • Dense, overlapping foliage in small balcony pots creates shelter, humidity, and physical bridges between plants.
    • Nitrogen-rich fertilising habits produce the soft, lush new growth that mealybugs, aphids, and thrips prefer to feed on.
    • Ants actively farm mealybug and aphid colonies — protecting them from natural predators and even physically transporting them to fresh plant parts — in exchange for the sweet honeydew these pests excrete.

    The cumulative result: sticky leaves coated in black sooty mould, flower buds aborting before opening, yellowing and curling foliage, and — in heavy infestations — near-complete plant collapse.

    How to Identify Mealybugs on Hibiscus, Crotons, and Indoor Plants

    Mealybugs (Pseudococcus spp. and Planococcus citri) are among the most persistent garden pests in India, particularly on ornamental plants kept in partial shade.

    Visual Signs of Mealybug Infestation

    • White, cottony, waxy clusters at leaf axils (where the leaf meets the stem), along main stems, and sometimes on roots below the soil line.
    • Sticky honeydew residue coating leaves and the pot surface below — often the first sign gardeners notice.
    • Black sooty mould (Capnodium spp.) growing on honeydew deposits, turning leaves grey-black and blocking photosynthesis.
    • Ants traffic moving purposefully up and down the stem — a reliable secondary indicator of mealybug or aphid presence.
    • Buds dropping before opening; new shoots yellowing and failing to extend normally.

    Most Affected Plants in Indian Gardens

    • Hibiscus (Hibiscus rosa-sinensis) — especially tender new shoots and flower buds
    • Crotons (Codiaeum variegatum)
    • Money plant (Epipremnum aureum) and other pothos varieties
    • Succulents, jade plants, cacti (root mealybugs)
    • Lemon and lime (Citrus spp.) in container gardens

    How to Identify Aphids on Tender Shoots and Flower Buds

    Aphids (Aphis gossypii, Myzus persicae, and related species) are soft-bodied, pear-shaped insects that cluster densely on the youngest, most nutrient-rich parts of plants.

    Visual Signs of Aphid Infestation

    • Dense clusters of tiny, soft-bodied insects — green, yellow, black, or brown depending on species — packed onto tender shoot tips, flower buds, and the undersides of young leaves.
    • Leaves curling or puckering as the plant tissue responds to feeding damage and the toxic saliva aphids inject.
    • Stunted, distorted new growth — shoots that emerge looking twisted or fail to straighten out.
    • Sticky honeydew on leaf surfaces and sooty mould developing rapidly in humid conditions.
    • Winged adults appearing when the colony is overcrowded, flying to colonise new plants.

    Most Affected Plants in Indian Gardens

    • Roses (Rosa spp.) — especially in cooler winter growing season
    • Chilli and capsicum (Capsicum annuum)
    • Hibiscus, marigolds, and most flowering annuals
    • Cabbage, mustard, and brassica vegetables

    How to Identify Thrips on Leaves and Flowers

    Thrips (Frankliniella occidentalis, Scirtothrips dorsalis) are the trickiest of the three to identify — they are minute (0.5–2 mm), slender, and hide inside flower buds and leaf folds, making them invisible to a casual glance.

    Visual Signs of Thrips Infestation

    • Silvery or bronze streaking on leaf surfaces — caused by thrips rasping away the lower cell layer and the air filling the empty cells.
    • Deformed, discoloured, or “burnt-looking” flower petals with brown or white flecks at the edges.
    • Flowers that fail to open properly, or open crooked and stunted.
    • Tiny black specks (faecal deposits) scattered near damaged tissue — a diagnostic detail often overlooked.
    • Leaf tips rolling under or showing a papery, dried-out texture without apparent disease.
    🔍 Thrips Detection Tip: The White Paper Test

    Hold a sheet of white paper under a suspect flower bud or rolled leaf, then tap or shake the plant part sharply. Thrips will fall onto the paper and move quickly — they’re tiny, elongated, and pale yellow to dark brown. This is the fastest way to confirm thrips presence without a magnifying glass.

    Mealybugs vs Aphids vs Thrips: Quick Identification Comparison

    Use this reference table for fast field diagnosis in your garden:

    Pest Appearance Location on Plant Key Diagnostic Sign Most Common Host Plants
    Mealybugs Soft, white waxy coating; oval, 2–5 mm Leaf axils, stems, roots, tight folds White cottony clusters + ant traffic Hibiscus, crotons, money plant, lemon
    Aphids Soft, pear-shaped; green, black, brown; 1–3 mm Shoot tips, buds, leaf undersides Dense visible clusters; curled/puckered new leaves Roses, chilli, hibiscus, brassicas
    Thrips Slender, elongated; pale to dark brown; 0.5–2 mm Inside flower buds, leaf folds Silvery streaks + tiny black droppings + deformed petals Hibiscus, roses, chilli, vegetables

    Why Are Sucking Pests the #1 Cause of Flower Drop and Bud Failure?

    The link between sucking pest infestations and flower drop is direct and well-documented. Here is the mechanism:

    1. Pests target tender buds and developing shoot tips — the actively growing tissue with the highest sugar and amino acid concentration — draining the plant of the resources it needs to sustain flower development.
    2. Feeding damage and toxic saliva from aphids and thrips trigger a stress signal in the plant, causing it to selectively abort developing buds to redirect energy to survival.
    3. Sooty mould on leaves reduces the leaf’s ability to photosynthesise, cutting the overall energy supply to developing flowers.
    4. Over time, even a moderately infested plant that is also fertilised and watered regularly will produce fewer flowers, smaller blooms, and more bud drop than an uninfested plant — because it is constantly redirecting resources to cope with pest stress.

    Why Do Contact Sprays Fail Against Hidden Mealybugs and Thrips?

    Contact insecticides (pyrethroids, carbamates) work by touching the insect directly. They are effective against visible, exposed populations — but all three of these pests exploit plant architecture to evade them:

    • Mealybugs pack into deep leaf axils and root zones where spray nozzles cannot reach and their waxy coating repels water-based sprays.
    • Thrips hide inside closed flower buds, emerging only briefly to feed — any spray applied to the flower exterior misses the insects entirely.
    • Aphid eggs and young nymphs shelter on the underside of tightly curled leaves, often protected by the curl itself from spray coverage.

    This is precisely why a systemic insecticide like TATA Tafgor (Dimethoate 30% EC) is more effective against these three pests than most contact alternatives — it moves through plant sap, reaching every part the insect feeds from regardless of where it is hiding.

    How Does TATA Tafgor (Dimethoate 30% EC) Control Mealybugs, Aphids, and Thrips?

    TATA Tafgor contains Dimethoate 30% EC (emulsifiable concentrate), an organophosphate systemic insecticide. After foliar application:

    1. Dimethoate is absorbed through leaf stomata and cuticle within 1–2 hours of spraying.
    2. It moves systemically through the plant’s vascular (phloem) tissue — the same sap that mealybugs, aphids, and thrips feed on.
    3. When pests insert their mouthparts and feed, they ingest Dimethoate along with the sap, disrupting their nervous system (acetylcholinesterase inhibition) and killing them within hours to days.
    4. Because the active ingredient is inside the plant, hidden pests in leaf axils, bud interiors, and root zones are equally exposed — coverage of the insect’s exact location is not required.

    Typical Application in Indian Home Gardens

    1. Mix TATA Tafgor at the label-recommended dose (typically 1–2 ml per litre of water for ornamental use — always verify on your pack).
    2. Spray thoroughly, ensuring good coverage of shoot tips, leaf undersides, and stem joints.
    3. Spray in early morning or evening; avoid application in temperatures above 35°C.
    4. Respect the pre-harvest interval (PHI) strictly if treating edible plants like chilli or lemon.
    5. Repeat after 10–14 days if new pest activity is observed.

    Buy TATA Tafgor (Dimethoate 30% EC)

    When to Use Sentry (Lambda-Cyhalothrin) for Sucking Pest Control

    Sentry (Lambda-Cyhalothrin) is a broad-spectrum synthetic pyrethroid contact insecticide. Unlike Tafgor, it does not move systemically through plant tissue — it kills insects by direct contact with the spray. This makes it ideal for:

    • Visible, exposed aphid colonies on the outside of shoots and leaves where spray coverage is achievable.
    • Mixed pest populations — when you are dealing with a garden where chewing insects (caterpillars, beetles) appear alongside sucking pests, Sentry covers a broader spectrum in a single application.
    • Ornamental, non-edible plants (hibiscus, crotons, roses) where the primary concern is knockdown speed rather than systemic persistence.
    • Spot treatments when a quick visible knockdown is needed between systemic spray intervals.
    🌿 Tafgor vs. Sentry: Which Should You Use?

    • Tafgor (Dimethoate 30% EC) — Choose when pests are hidden (mealybugs in axils, thrips in buds), or when the infestation is severe and recurring. Systemic action reaches where sprays can’t.
    • Sentry (Lambda-Cyhalothrin) — Choose for visible, accessible aphid colonies or mixed pest outbreaks requiring broad-spectrum knockdown. Best for ornamentals.
    • Combination approach: Some gardeners use Sentry for an immediate knockdown followed by Tafgor 5–7 days later to eliminate survivors and hidden stages. Check label compatibility before mixing in one tank.

    Buy Sentry (Lambda-Cyhalothrin)

    Non-Chemical Measures to Reduce Mealybugs, Aphids, and Thrips

    Chemical control is significantly more effective — and requires fewer repeat applications — when combined with cultural practices that reduce pest pressure independently:

    • High-pressure water washing: Direct a firm jet of water at infested shoot tips, leaf axils, and leaf undersides to dislodge and kill soft-bodied pests mechanically. Do this in the morning so leaves dry quickly. Repeat every 3–4 days during an active infestation.
    • Prune infested plant material: Cut back heavily colonised shoots and buds. Seal removed material in a bag immediately — do not leave it on the ground where pests can re-emerge.
    • Control ants aggressively: Ants are the gardener’s hidden enemy in sucking pest management. Trim branches that touch walls or adjacent plants to remove ant highways. Apply a sticky barrier (such as tanglefoot) around pot rims to prevent ant access.
    • Avoid excess nitrogen fertilisation: High nitrogen promotes the soft, lush, nutrient-rich new growth that sucking pests prefer. Use balanced or potassium-rich fertilisers during high-risk seasons.
    • Improve plant spacing: Crowded pots with overlapping foliage trap humidity and create insect corridors. Spacing plants 15–20 cm apart dramatically reduces pest spread between plants.

    Safety When Using Tafgor and Sentry on Garden Plants

    ⚠️ Safety Protocols for Dimethoate (TATA Tafgor) and Lambda-Cyhalothrin (Sentry)

    • PPE: Wear chemical-resistant rubber gloves, a P2/N95 mask or respirator, safety goggles, and full-length clothing. Wash all exposed skin immediately after use with soap and water.
    • Ventilation: Always mix and apply in open outdoor areas. Never handle Dimethoate in enclosed spaces — it is an organophosphate and requires adequate ventilation during mixing.
    • Pet & children safety: Keep children and pets away from treated plants and the surrounding area for at least 24–48 hours or until the foliage is fully dry.
    • Edible crops (Tafgor): Dimethoate is an organophosphate with a mandatory pre-harvest interval (PHI). Do not apply to lemon, chilli, or any edible crop without confirming and observing the PHI on the current product label.
    • Aquatic safety: Lambda-Cyhalothrin (Sentry) is highly toxic to fish and aquatic invertebrates. Do not spray near ponds, fish tanks, or open drains. Rinse sprayers away from water bodies.
    • Pollinator safety: Both products are harmful to bees. Do not spray when flowering plants are in active bloom or when bees are visibly foraging. Spray in early morning before bee activity peaks.
    • Storage: Store in original sealed packaging in a cool, dry, locked location away from food, water, and reach of children.

    Frequently Asked Questions About Mealybugs, Aphids, and Thrips in Indian Gardens

    Why do my hibiscus plants keep getting mealybugs even after spraying?

    Recurring mealybug infestations on hibiscus are almost always caused by three factors: (1) ants re-introducing mealybugs from soil or adjacent plants, (2) spray coverage missing deep leaf axils where mealybug populations survive, and (3) not repeating sprays to catch newly hatched nymphs from surviving eggs. Switch to a systemic insecticide like TATA Tafgor (Dimethoate 30% EC) at 10-day intervals and simultaneously cut all ant access routes to the plant.

    What is the difference between mealybug and aphid damage on chilli plants?

    On chilli plants, aphids cluster in visible, tight groups on shoot tips and cause leaves to curl inward and turn yellow-green. Mealybugs appear as white cotton-like patches at stem joints and cause sticky honeydew with black sooty mould below. Both cause similar flower drop and stunted growth — but aphid damage progresses faster because aphid colonies double in size every 2–3 days in warm conditions.

    Can I use TATA Tafgor on roses and hibiscus simultaneously?

    Yes. TATA Tafgor (Dimethoate 30% EC) is suitable for ornamental plants including roses and hibiscus. Apply at the label-recommended rate (typically 1–2 ml/L), spray in the early morning, and avoid application during peak flowering when bees may be active. Do not spray in temperatures above 35°C as phytotoxicity risk increases with heat and stress.

    How do I get rid of thrips from inside flower buds?

    Thrips inside closed flower buds cannot be reached by contact insecticides. The most effective strategy is a systemic insecticide like TATA Tafgor (Dimethoate 30% EC), which is absorbed into the plant sap that thrips feed on, exposing them regardless of where they are hiding. Additionally, removing and destroying heavily infested buds before they open prevents adult thrips from dispersing to new growth. Repeat systemic sprays every 10–14 days.

    Is it safe to spray insecticides on lemon plants in a balcony garden?

    Yes, with strict precautions. For lemon (Citrus spp.) treat it as an edible crop. Use TATA Tafgor only during vegetative growth stages when fruit is not present, or observe the PHI carefully. Spray early morning in downward-facing spray pattern to avoid drift. Move any edible plants (herbs, vegetables) at least 3 metres away before spraying. Keep balcony windows closed during and for 2 hours after spraying.

    Conclusion: Identify First, Treat Right, Prevent Recurrence

    The key to winning the battle against mealybugs, aphids, and thrips in Indian gardens is correct identification before reaching for a product. Each pest exploits plant architecture differently — and treating them effectively means matching the tool to the hiding strategy. Contact sprays alone will not eliminate mealybugs entrenched in deep axils or thrips sealed inside flower buds.

    A complete strategy combines TATA Tafgor (Dimethoate 30% EC) for systemic reach into hidden feeding sites, Sentry (Lambda-Cyhalothrin) for broad-spectrum knockdown of visible populations, and consistent cultural practices — pruning, washing, ant control, and balanced fertilisation — to prevent reinfestation. Regular monitoring is not optional: in Indian climates, a small colony of aphids or mealybugs can grow into a crisis-level infestation within two weeks.

    Buy TATA Tafgor (Dimethoate 30% EC)
    Buy Sentry (Lambda-Cyhalothrin)

  • Aries Plantomycin: The Plant Antibiotic Every Indian Gardener Needs Against Bacterial Disease

    TL;DR — When to Reach for Aries Plantomycin

    • Aries Plantomycin is a plant antibiotic combining Streptomycin Sulphate 9% and Tetracycline Hydrochloride 1% — engineered specifically for bacterial plant diseases.
    • Use it when plants show sudden wilting despite moist soil, greasy water-soaked leaf spots, or stem ooze — classic signs of bacterial (not fungal) infection.
    • It is not a fungicide. For powdery mildew, downy mildew, or fungal leaf spots, use UPL SAAF or Indofil M-45 (Mancozeb 75% WP) instead.
    • Works best at early infection stage, at 0.5–1 g per litre of water, repeated every 7–10 days.
    • Pair with TATA Blitox (Copper Oxychloride 50% WP) for a systemic + surface dual-action strategy against both bacterial and fungal threats.

    What Exactly Is Aries Plantomycin and How Is It Different From a Fungicide?

    Walk into any agro-input shop in India and you’ll find shelves full of fungicides — Mancozeb, Carbendazim, Propiconazole. But when your tomato plant collapses overnight despite wet soil, none of those will help. That’s because you’re fighting a bacterial pathogen, not a fungus. Aries Plantomycin is formulated for exactly this situation.

    Manufactured by Aries Agro Limited, Plantomycin is a broad-spectrum plant bactericide in water-soluble powder form. It contains two complementary antibiotic active ingredients that work together to suppress bacterial growth inside plant tissue:

    • Streptomycin Sulphate (9%) — An aminoglycoside antibiotic that binds to the bacterial 30S ribosomal subunit, halting protein synthesis and reproduction of pathogenic bacteria like Ralstonia solanacearum and Xanthomonas spp.
    • Tetracycline Hydrochloride (1%) — A broad-spectrum bacteriostatic antibiotic that further inhibits bacterial protein production through a complementary mechanism, enhancing the overall efficacy of the formulation.

    The dual-antibiotic formula attacks bacterial pathogens through two pathways simultaneously, making resistance development significantly harder compared to a single active ingredient product.

    Buy Aries Plantomycin (Streptomycin + Tetracycline)

    Which Bacterial Diseases Does Aries Plantomycin Treat?

    Aries Plantomycin is registered and recommended for a range of bacterial plant diseases that are particularly common in India’s warm, humid climate. Below is a reference guide to match symptoms to use cases:

    Disease Affected Crops Key Symptom Plantomycin Effective?
    Bacterial Wilt (Ralstonia solanacearum) Tomato, Brinjal, Chilli, Potato Sudden wilt despite moist soil; milky stem ooze in water ✅ Yes — use at first sign
    Bacterial Blight (Xanthomonas spp.) Tomato, Chilli, Cabbage, Bean Angular, greasy/water-soaked leaf spots turning brown-black ✅ Yes — spray early
    Black Rot (Xanthomonas campestris) Cabbage, Cauliflower, Broccoli V-shaped yellow lesions from leaf margins; blackened veins ✅ Yes — most effective early
    Bacterial Canker (Clavibacter michiganensis) Tomato, Fruit trees Dark sunken lesions on stems/fruit; gumming from bark ✅ Yes — combine with pruning
    Bacterial Leaf Spots Ornamentals, vegetables Small, water-soaked spots with yellow halos ✅ Yes — preventive + curative
    Powdery / Downy Mildew Any crop White powder or grey-purple fuzz on leaves ❌ No — use a fungicide instead
    Fungal Leaf Spots (Alternaria, Cercospora) Any crop Circular/oval brown spots, often with concentric rings ❌ No — use Mancozeb or SAAF
    🔍 Bacterial vs. Fungal: The Fastest Field Check

    Cut a wilting stem 5 cm above the base and suspend it in a glass of clear water. Watch for 60 seconds. A white, milky, thread-like ooze streaming from the cut end = bacterial wilt confirmed. A clean cut with no ooze = likely fungal or abiotic (watering, heat). This test takes under 2 minutes and determines whether you need Plantomycin or a fungicide.

    How Does Aries Plantomycin Work Inside the Plant?

    When Aries Plantomycin is applied as a foliar spray or soil drench, the water-soluble powder dissolves completely and the antibiotic molecules are absorbed through leaf stomata and stem tissue. Once inside the plant’s vascular system:

    1. Streptomycin Sulphate binds to bacterial ribosomes in the vascular tissue, stopping harmful bacteria like Ralstonia solanacearum from producing the proteins they need to multiply and colonise the plant’s water-conducting xylem vessels.
    2. Tetracycline Hydrochloride provides a complementary bacteriostatic effect, slowing bacterial growth through a separate inhibition mechanism — leaving bacterial cells unable to reproduce even if the primary action is partially resisted.
    3. Healthier, uncolonised parts of the plant are protected from fresh infection as new growth emerges during the treatment window.

    Critically, Plantomycin is most effective when used at the early stage of infection — before the vascular system is fully blocked by bacterial colonisation. Once a plant has fully collapsed, chemical intervention cannot reverse the damage.

    How to Mix Aries Plantomycin for Your Garden Sprayer

    Aries Plantomycin is a fine, free-flowing water-soluble powder that dissolves completely without residue. Always check the current product label for the definitive rate, but the following general guideline applies to most home garden applications:

    • Standard foliar rate: 0.5–1 gram of Plantomycin per litre of water.
    • For a 15-litre knapsack sprayer: 7.5–15 grams per full tank.
    • For a 1-litre hand pump sprayer (common for balcony/terrace gardens): 0.5–1 gram per filled bottle.

    Step-by-Step Mixing Procedure

    1. Use a clean, dry sprayer tank or bucket — residues from previous chemicals can react or reduce efficacy.
    2. Add approximately one-third of the final water volume to the tank first.
    3. Measure the required quantity of Aries Plantomycin using a digital kitchen scale for accuracy.
    4. Add the powder gradually while stirring — it dissolves quickly with no clumping.
    5. If tank-mixing with TATA Blitox, add Blitox after Plantomycin is fully dissolved, then top up with water. Always do a small test mix (50 ml) to confirm compatibility before making a full tank.
    6. Fill the tank to the final volume and agitate well before spraying.
    ⏰ Spray Timing for Best Results

    Spray early morning (before 9 AM) or in the evening (after 5 PM) when temperatures are below 30°C and wind is calm. Spraying in mid-day summer heat above 35°C can cause leaf burn (phytotoxicity) and reduces absorption. Avoid spraying if rain is forecast within 4 hours — rain will wash off the product before absorption.

    How to Apply Aries Plantomycin on Garden Plants: Full Application Guide

    Proper application technique matters as much as dosage. Follow this sequence for maximum effectiveness:

    1. Remove and destroy severely infected material first.
      Pull out fully collapsed plants. Cut and bag heavily blighted leaves. Never compost infected plant material — this re-seeds the pathogen into your soil. Dispose in a sealed bag or burn if local rules permit.
    2. Disinfect your tools.
      Dip pruning shears and knives in a solution of 10% household bleach (sodium hypochlorite) between cuts. A single contaminated blade can carry Ralstonia solanacearum to 10+ healthy plants.
    3. Spray all plant surfaces thoroughly.
      Cover leaf tops, leaf undersides (where bacteria often enter through stomata), stems, and the soil surface around the plant base for soilborne pathogens.
    4. Repeat at 7–10 day intervals.
      Continue spraying until new growth appears healthy and no new lesions develop. Do not exceed the maximum number of applications stated on the product label per season.
    5. Follow up with cultural corrections.
      Switch to base watering (drip or pour at the root zone, not overhead). Improve soil drainage if waterlogging is present — saturated soil accelerates bacterial spread.

    Real-World Use Cases in Indian Home Gardens

    🍅 Tomato & Chilli — Bacterial Wilt and Blight

    Symptoms: Tomato plants wilt dramatically during the afternoon despite adequate soil moisture. Some plants recover at night but wilt again the next morning before collapsing fully within 3–5 days. Chilli shows angular, greasy leaf spots.
    Action: Remove fully collapsed tomato plants immediately. Begin Plantomycin sprays (0.5–1 g/L) on surviving plants every 7 days. Combine with TATA Blitox for surface protection. Avoid overhead irrigation.

    🥦 Cabbage & Cauliflower — Black Rot

    Symptoms: V-shaped yellow lesions starting from leaf margins, with dark blackened veins inside the leaf. Affects crucifers (cabbage, cauliflower, broccoli) heavily during humid monsoon conditions.
    Action: Remove affected outer leaves. Spray Plantomycin at 7–10 day intervals from first symptom appearance. Rotate cabbage family crops to a different bed the following season.

    🌳 Fruit Trees — Canker and Gummosis

    Symptoms: Dark, sunken, cracked lesions appear on branches or the bark of mango, guava, or citrus trees, sometimes with gum oozing from the wound.
    Action: Prune affected branches at least 15 cm below the visible lesion, sterilising tools between every cut. Apply multiple cover sprays of Plantomycin as per label dosage. Paste the pruning wounds with a copper-paste or Blitox slurry.

    Buy Aries Plantomycin (Streptomycin + Tetracycline)
    Buy TATA Blitox (Copper Oxychloride 50% WP)

    When Should You NOT Use Aries Plantomycin?

    Knowing when not to use a product is as important as knowing when to use it. Misapplication of plant antibiotics wastes money, risks phytotoxicity, and contributes to antibiotic resistance in soil ecosystems.

    • Do not use for fungal diseases. If you see white powder, grey fuzz, concentric-ring spots, or classic powdery mildew — reach for a fungicide like UPL SAAF (Carbendazim 12% + Mancozeb 63% WP) or Indofil M-45 (Mancozeb 75% WP) instead. Plantomycin will have no effect on fungal pathogens.
    • Do not use on a fully dead plant. If the stem has rotted at the base and the entire plant is collapsed, antibiotic treatment cannot reverse the damage. Remove the plant and treat the soil.
    • Do not use as a “routine” preventive spray. Reserve Plantomycin for when bacterial disease is confirmed or strongly suspected. Routine antibiotic spraying encourages antibiotic resistance in soil bacteria.
    • Do not spray on actively flowering plants where bees or other pollinators are foraging — antibiotic residues can affect beneficial insects.
    • Do not use close to harvest without confirming the pre-harvest interval (PHI) on the current product label.

    Safety and Responsible Use of Aries Plantomycin

    ⚠️ Safety Protocols — Read Before Mixing or Spraying

    • PPE: Wear waterproof chemical-resistant gloves, a P2/N95 face mask or respirator, safety goggles, and full-length clothing when mixing and applying. Wash all exposed skin thoroughly with soap and water after use.
    • Ventilation: Mix and apply only in open, outdoor areas with good natural airflow. Never prepare spray solutions indoors or in poorly ventilated sheds.
    • Pet & children safety: Keep children, pets, and livestock out of the treated area for a minimum of 24–48 hours post-spray, or until all foliage is visibly dry.
    • Pre-harvest interval (PHI): Strictly observe the PHI printed on the product label before harvesting and consuming any treated crop. PHI varies by crop — check the label for your specific vegetable or fruit.
    • Antibiotic stewardship: Streptomycin and Tetracycline are regulated antibiotic classes. Overuse in agriculture contributes to antibiotic resistance in soil microbiomes. Use only when bacterial infection is confirmed, at label-specified doses and intervals. Do not increase dose or shorten intervals to “get faster results.”
    • Storage: Store in original sealed packaging in a cool, dry place away from direct sunlight, food, and drinking water. Keep out of reach of children.
    • Sprayer disposal: Triple-rinse the sprayer after use and dispose of rinse water away from drains, water bodies, and vegetable beds.

    Frequently Asked Questions About Aries Plantomycin

    What is Aries Plantomycin used for in gardens?

    Aries Plantomycin is used to treat bacterial plant diseases including bacterial wilt (caused by Ralstonia solanacearum), bacterial blight (Xanthomonas spp.), black rot in crucifers, and bacterial canker in fruit trees. It contains Streptomycin Sulphate 9% and Tetracycline Hydrochloride 1% in a water-soluble powder formulation that is absorbed into plant vascular tissue to suppress bacterial growth.

    How much Aries Plantomycin should I use per litre of water?

    The standard home garden rate is 0.5 to 1 gram per litre of water, depending on disease severity and the specific crop being treated. For a 15-litre knapsack sprayer, this equals 7.5–15 grams per full tank. Always verify against the current product label, as formulations can change between batches.

    Can I mix Aries Plantomycin with TATA Blitox in one tank?

    The combination of Aries Plantomycin and TATA Blitox (Copper Oxychloride 50% WP) is a widely recommended dual-action strategy — Plantomycin targets bacteria systemically inside the plant while Blitox creates a protective copper barrier on leaf surfaces. Before making a full-tank mix, always conduct a small compatibility test (50 ml of each at label dose) — if the solution remains uniform without separation or precipitation, it is safe to proceed.

    Will Aries Plantomycin work on powdery mildew or fungal leaf spots?

    No. Aries Plantomycin has no antifungal activity. It is specifically formulated for bacterial pathogens. For powdery mildew, downy mildew, or fungal leaf spots (Alternaria, Cercospora), use a registered fungicide such as UPL SAAF (Carbendazim + Mancozeb) or Indofil M-45 (Mancozeb 75% WP). Applying Plantomycin to a fungal disease will waste the product and allow the fungal infection to progress unchecked.

    How often should I spray Aries Plantomycin?

    Spray at 7–10 day intervals during active disease pressure, continuing until new plant growth is healthy and no new lesions are appearing. Do not exceed the maximum number of applications specified on the product label per crop season. Between sprays, focus on cultural corrections — reduce overhead watering, improve drainage, and remove infected plant material.

    Conclusion: Why Aries Plantomycin Belongs in Every Serious Indian Home Garden

    Most home gardeners in India have a bottle of SAAF and a packet of Mancozeb — and for fungal diseases, those choices are correct. But the moment a tomato plant wilts overnight, a chilli stem starts oozing, or a cabbage develops blackened V-shaped lesions, a fungicide is the wrong tool entirely. That gap in the Indian home gardener’s toolkit is precisely what Aries Plantomycin (Streptomycin Sulphate 9% + Tetracycline Hydrochloride 1%) fills.

    Used correctly — at the right stage, right dose, and in combination with TATA Blitox for surface protection and good cultural hygiene — it can salvage crops that would otherwise collapse within days. Kept in reserve for confirmed bacterial disease and rotated responsibly to prevent resistance, it is one of the most impactful additions to a serious gardener’s plant protection arsenal.

    Buy Aries Plantomycin (Streptomycin + Tetracycline)
    Buy TATA Blitox (Copper Oxychloride 50% WP)

  • Bacterial Wilt & Blight: The Silent Garden Killers in Indian Home Gardens

    Bacterial Wilt & Blight: The Silent Garden Killers in Indian Home Gardens

    TL;DR — When Healthy Plants Suddenly Collapse

    • If your tomato, chilli, or brinjal wilts even though the soil is moist, you’re likely dealing with bacterial wilt or blight — not a fungal disease.
    • Standard fungicides (SAAF, Indofil M-45) do not work against bacterial pathogens.
    • You need plant antibiotics — specifically Aries Plantomycin (Streptomycin Sulphate 9% + Tetracycline Hydrochloride 1%), ideally combined with TATA Blitox (Copper Oxychloride 50% WP) for surface protection.
    • Act fast: bacterial wilt can kill a healthy plant within 3–5 days in warm, humid Indian summers.
    • Combine chemical intervention with hygiene and crop rotation for lasting control.

    What Is the Difference Between Fungal and Bacterial Plant Diseases?

    Most Indian home gardeners reach for a fungicide the moment they see their plants suffer — but bacterial diseases require an entirely different treatment approach. Understanding the distinction can save your crop before it’s too late.

    Fungal diseases (caused by pathogens like Alternaria, Cercospora, and downy/powdery mildews) typically produce spots, patches, or powdery coatings on leaves. They spread slowly via airborne spores and usually respond well to fungicides like Mancozeb or Carbendazim.

    Bacterial diseases, by contrast, cause wilting, water-soaked or greasy lesions, brown vascular discolouration in stems, and sometimes a sticky ooze when stems are cut. They spread through rain splash, contaminated tools, and infected seeds — and they can kill a previously healthy plant within days.

    Feature Fungal Diseases Bacterial Diseases
    Typical symptom Spots, patches, powdery growth, slow onset Sudden wilt, greasy/water-soaked lesions, stem ooze
    Affected tissue Leaf surface, older leaves first Vascular system, can collapse entire plant
    Speed of damage Days to weeks Hours to days (3–5 days to plant death)
    Effective treatment Fungicides (SAAF, Indofil M-45, Mancozeb) Plant antibiotics + copper (Plantomycin + Blitox)
    Spreads via Airborne spores, wind, rain splash Splashing water, infected tools, infected seed
    Key prevention Fungicide schedule, good airflow Hygiene, crop rotation, resistant varieties

    What Does Bacterial Wilt Look Like on Tomato, Chilli, and Brinjal?

    Bacterial wilt — caused primarily by Ralstonia solanacearum — is one of the most destructive soilborne bacterial diseases in India. It thrives in warm, moist conditions, making Indian summers and monsoon seasons peak risk periods for home gardens.

    Classic Symptoms of Bacterial Wilt

    • Plants suddenly wilt during the day, even though soil moisture is adequate — this is the key diagnostic clue.
    • Wilting often begins on one side of the plant before spreading to the entire stem.
    • Leaves remain green initially but droop permanently and never recover after watering.
    • Cutting the stem reveals brown discolouration in the vascular tissue.
    • When a cut stem section is placed in clear water, a milky, thread-like bacterial ooze streams out — a definitive field test for bacterial wilt.
    💡 Quick Field Test for Bacterial Wilt

    Cut a stem 5 cm from the base and suspend the cut end in a glass of clear water. If you see white, thread-like streams after 30–60 seconds, Ralstonia solanacearum (bacterial wilt) is the likely cause. A clean, colourless cut indicates a different problem.

    What Does Bacterial Blight Look Like on Leaves?

    Bacterial blight affects a wide range of vegetable crops including tomato, chilli, cabbage, and bean. Unlike wilt, which destroys the plant from the inside out, blight first manifests on leaf surfaces and moves inward.

    Common Signs of Bacterial Blight

    • Angular, water-soaked (greasy-looking) lesions on the leaf surface — the angular shape is because lesions are bordered by leaf veins.
    • Spots initially appear translucent, then turn brown or black as tissue dies.
    • Lesions often progress along leaf edges and veins, giving a ragged appearance.
    • In severe cases, entire leaves or growing shoots blacken and die back.
    • On tomato and chilli, significant leaf loss reduces photosynthesis and can cut yields by 20–40% even without complete plant death.

    Why Don’t Fungicides Work Against Bacterial Diseases?

    Bacterial wilt and blight are caused by prokaryotic bacteria (Ralstonia solanacearum, Xanthomonas spp., Pseudomonas syringae), not by fungi. Fungicides are specifically formulated to inhibit fungal cell wall synthesis and reproduction — they have no mechanism of action against bacterial cells.

    Spraying Mancozeb, Carbendazim, or Propiconazole on a bacterial infection wastes money, delays effective treatment, and allows the bacteria to spread further. The correct answer is a plant antibiotic — and in India, the most accessible option is Aries Plantomycin.

    What Is Aries Plantomycin and How Does It Control Bacterial Disease?

    Aries Plantomycin is a broad-spectrum bactericide formulated as a water-soluble powder, combining two antibiotic active ingredients:

    • Streptomycin Sulphate — 9%: An aminoglycoside antibiotic that inhibits bacterial protein synthesis by binding to the 30S ribosomal subunit, preventing bacterial reproduction.
    • Tetracycline Hydrochloride — 1%: A broad-spectrum antibiotic that further disrupts bacterial protein production, providing a dual-action synergistic effect.

    Together, these two active ingredients attack bacterial plant diseases through two complementary pathways — making resistance development harder than with a single-mode product.

    Diseases Controlled by Aries Plantomycin

    • Bacterial wilt (caused by Ralstonia solanacearum)
    • Bacterial blight (caused by Xanthomonas spp.)
    • Black rot and bacterial canker
    • Bacterial leaf spots of various origins

    Buy Aries Plantomycin (Streptomycin + Tetracycline)

    Why Combine Aries Plantomycin with TATA Blitox?

    TATA Blitox (Copper Oxychloride 50% WP) is a surface-protective, broad-spectrum fungicide with proven bactericidal activity against pathogens on leaf surfaces. While Plantomycin works systemically inside the plant’s vascular tissue, Blitox creates a hostile copper shield on exposed leaf and stem surfaces, disrupting bacterial cell membranes before infection can penetrate.

    🌿 The Dual-Action Strategy

    • Aries Plantomycin — Systemic antibiotic action; targets bacteria that have already entered the plant’s vascular system.
    • TATA Blitox — Protective surface barrier; prevents new bacterial (and fungal) spores and cells from establishing on leaf and stem surfaces.
    • Together: broader spectrum, longer protection window, and better resistance management than either product alone.

    Buy TATA Blitox (Copper Oxychloride 50% WP)

    Step-by-Step Spray Routine for Bacterial Wilt and Blight

    The following schedule is a general guide for home gardeners. Always read and follow the dosage and interval printed on each product label — label instructions are legally mandatory and formulation-specific.

    1. Diagnose first. Confirm bacterial disease using the stem-ooze test (see info-box above) or by observing angular water-soaked lesions. Do not spray plant antibiotics if the disease appears fungal.
    2. Remove and destroy infected material immediately. Pull out severely wilted plants. Remove and bag heavily blighted leaves. Do not compost — dispose of plant material in a sealed bag or burn if permitted.
    3. At first confirmed bacterial symptoms: Mix Aries Plantomycin and TATA Blitox in water as per their respective label doses. Spray thoroughly on all plant surfaces — leaf tops, undersides, stems, and the soil around the base.
    4. Repeat every 7–10 days during active disease pressure or through the monsoon season.
    5. Do a test spray first if combining two products for the first time — apply to 2–3 plants and wait 48 hours to ensure no phytotoxicity before treating your entire garden.
    6. Avoid overhead watering in the evening. Wet foliage overnight is the fastest route to bacterial and fungal spread. Water at the base of plants in the morning when possible.

    Cultural Practices That Reduce Bacterial Disease — Chemicals Alone Are Not Enough

    Even the best plant antibiotic cannot compensate for poor cultural practices. In Indian kitchen gardens and small home plots, these four habits dramatically reduce recurring bacterial disease pressure:

    • Crop rotation: Avoid growing tomato, chilli, brinjal, or potato in the same bed for consecutive seasons. Ralstonia solanacearum can survive in soil for 2–3 years; rotating to non-solanaceous (unrelated) crops starves it of a host.
    • Resistant varieties: For tomato, varieties bred with bacterial wilt tolerance (such as Arka Rakshak and some hybrid lines from IIVR) are commercially available in Indian markets. Ask your local nursery for wilt-resistant options.
    • Tool hygiene: Disinfect pruners and knives between plants with a 10% bleach solution or 70% isopropyl alcohol. A single cut on an infected plant can transmit bacteria to 10 healthy ones.
    • Avoid working in the garden when leaves are wet: Handling plants during or after rain greatly increases mechanical spread of bacteria from plant to plant.
    📌 Golden Rule for Indian Home Gardeners

    If you are unsure whether the problem is fungal or bacterial, start with TATA Blitox (Copper Oxychloride 50% WP) first — it has both fungicidal and surface bactericidal activity. Monitor for 5–7 days. If wilting or oozing persists, add Aries Plantomycin to your spray programme for antibiotic action.

    Safety and Responsible Use of Plant Antibiotics in Home Gardens

    ⚠️ Safety & Responsible Use Guidelines

    • PPE: Always wear waterproof gloves, a face mask/respirator, and safety goggles when mixing and spraying. Avoid touching eyes or face during application.
    • Ventilation: Spray in open, well-ventilated outdoor areas. Do not spray in enclosed spaces or greenhouses without adequate airflow.
    • Pet & children safety: Keep children and pets away from the treated area for at least 24–48 hours post-spray, or until foliage is fully dry.
    • Pre-harvest interval: Do not spray close to harvest without confirming the pre-harvest interval (PHI) on the product label. Plantomycin and Blitox have specific PHI requirements for edible crops.
    • Resistance management: Do not exceed label-recommended doses or frequencies. Overuse of Streptomycin in agriculture has contributed to antibiotic resistance globally — use only when bacterial disease is confirmed.
    • Disposal: Rinse sprayers thoroughly after use. Never pour diluted spray solution into drains or water bodies.

    Frequently Asked Questions About Bacterial Wilt and Blight in Indian Gardens

    Can bacterial wilt in tomato be cured once the plant is fully wilted?

    No. Once a tomato plant has fully wilted due to Ralstonia solanacearum, the vascular system is irreversibly blocked and the plant cannot recover. The priority is to remove the infected plant immediately, treat the surrounding soil with a copper-based drench (TATA Blitox), and protect neighbouring healthy plants with Aries Plantomycin sprays. Early-stage intervention — when only one side or one stem shows symptoms — gives the best chance of saving adjacent plants.

    Is Aries Plantomycin safe for vegetables like tomato and chilli?

    Yes, when used at label-recommended dosages and respecting the pre-harvest interval (PHI) printed on the label, Aries Plantomycin (Streptomycin Sulphate 9% + Tetracycline Hydrochloride 1%) is registered for use on vegetable crops in India. Always test on a small area first and avoid spraying in extreme heat (above 35°C) to prevent phytotoxicity.

    What is the difference between bacterial wilt and water stress in tomato?

    Both conditions cause wilting, but water stress wilting recovers fully after irrigation within a few hours. Bacterial wilt does not recover even after thorough watering. Additionally, bacterial wilt often starts on one side of the plant or on individual branches, while heat/drought stress affects the entire plant uniformly. The definitive test is the stem ooze test described in this article.

    Can I use TATA Blitox alone to control bacterial blight?

    TATA Blitox (Copper Oxychloride 50% WP) has surface bactericidal activity and is effective for managing early or mild bacterial blight, especially on leaf surfaces. However, for confirmed bacterial wilt or systemic infections, Blitox alone is insufficient — Aries Plantomycin must be added for internal antibiotic action. Use Blitox as your protective baseline, and escalate to the combination if symptoms progress.

    How do bacteria spread in a home garden and how can I stop it?

    In home gardens, bacterial plant diseases spread primarily through: (1) rain splash and overhead watering carrying bacteria from infected to healthy leaves; (2) contaminated pruning tools used across multiple plants; (3) infected transplants or seeds brought in from outside; and (4) soilborne survival of pathogens like Ralstonia solanacearum for up to 3 years. Prevention requires tool disinfection with 10% bleach, avoiding evening overhead watering, and practising crop rotation.

    Conclusion: Act Fast, Use the Right Tools, and Prevent Recurrence

    Bacterial wilt and blight are among the most misdiagnosed and consequently mistreated diseases in Indian home gardens. Because they look similar to other problems — overwatering, fungal disease, heat stress — many gardeners lose entire crops while applying the wrong products.

    The key principles are simple: identify the disease correctly, remove affected plants quickly, and reach for Aries Plantomycin (Streptomycin Sulphate + Tetracycline Hydrochloride) combined with TATA Blitox (Copper Oxychloride 50% WP) at the first confirmed sign of bacterial infection. Pair chemical treatment with strict garden hygiene, crop rotation, and resistant varieties — and these “silent garden killers” can be managed effectively even in the challenging warm, humid climate of an Indian home garden.

    Buy Aries Plantomycin (Streptomycin + Tetracycline)
    Buy TATA Blitox (Copper Oxychloride 50% WP)

  • PCI Trubble Gum: The 3 Best Places to Hide Rat Glue Pads

    TL;DR: Where exactly should you place PCI Trubble Gum for maximum catch rates?

    The single biggest reason rat glue traps fail is incorrect floor placement. PCI Trubble Gum works exceptionally well, but strictly when positioned directly along established rodent travel routes. To guarantee success, you must place the pads flush against the wall in three critical micro-environments: physically wedged behind the warm refrigerator compressor, hidden deep in the dark rear corners of the kitchen sink cabinet, and perpendicularly blocking structural entry gaps like broken vents or under-door spaces.

    Why does glue trap placement matter more than the chemical adhesive strength?

    You can purchase the most aggressive industrial glue pad in the world, but it will never catch a single rat if the rodent actively refuses to step on it. Urban rodents, specifically the Indian roof rat (Rattus rattus), are highly predictable creatures of habit guided by intense survival instincts:

    • The Thigmotaxis Instinct: Rodents universally experience severe anxiety in open spaces. They physically hug hard walls and heavy baseboards so their sensitive whiskers remain in constant physical contact with a solid surface.
    • The Neophobia Reflex: Mature rats possess a crippling biological fear of new, unrecognizable objects abruptly placed in the middle of a familiar room.
    • Darkness Preference: They exclusively utilize dark, structurally protected corridors to travel between their hidden nest and their primary food source.

    To successfully capture them, you must mathematically force them to walk over the PCI Trubble Gum by placing it exactly where they already habitually run, effectively weaponizing their own biological paranoia against them.

    Buy PCI Trubble Gum (Rat trap)

    Place 1: How do you correctly configure a trap behind the kitchen refrigerator?

    The physical space immediately behind a heavy kitchen refrigerator is statistically the most heavily trafficked rodent highway in any modern Indian home.

    • The Attraction: The rear compressor motor provides constant, comforting physical heat. The space is completely dark, entirely undisturbed by daily human cleaning, and frequently collects dropped biological food crumbs.

    The Strategic Placement Procedure:

    1. Carefully pull the heavy refrigerator forward exactly two to three inches from the back wall to expose the hidden transit channel.
    2. Place a fresh Trubble Gum pad flat on the floor, pushed absolutely flush against the back baseboard wall. Avoid placing it in the exact center of the gap.
    3. Slowly slide the refrigerator back into its original position, intentionally creating a narrow, unavoidable structural tunnel that forces the foraging rat to walk directly over the sticky adhesive surface.

    Place 2: Where exactly under the kitchen sink should you hide a glue pad?

    The dark cabinet physically located directly underneath the primary kitchen sink operates as the central drinking and staging area for an active rodent colony.

    • The Attraction: The cabinet provides high inherent humidity, inevitable microscopic water drips, and direct physical access to municipal drainage pipes which often contain chewable entry gaps around the PVC plastic.

    The Strategic Placement Procedure:

    1. Completely clear the entire under-sink cabinet of all cluttered chemical cleaners and spare sponges.
    2. Identify exactly where the primary PVC drain pipe physically breaches the concrete wall or wooden floor base.
    3. Place one or two Trubble Gum pads directly in the absolute darkest, rear structural corners of the cabinet, orienting the long edge of the trap tightly against the side panel.

    Professional Water Warning: Strictly ensure the glue pad is resting on completely dry wood or tile. Even microscopic amounts of pooled, standing water or aggressive condensation will instantly coat the trap and permanently neutralize the industrial adhesive’s physical stickiness.

    Place 3: How do you intercept rats near structural wall gaps and door entry points?

    Adult mice physically require an opening no larger than a standard wooden pencil (6mm) to squeeze through, while adult rats can easily collapse their flexible skeletal rib cages to breach any gap larger than a small coin (15mm).

    • The Attraction: Loose AC conduit lines, chewed gaps under wooden exterior doors, and broken exhaust ventilator screens serve as primary nightly infiltration points.

    The Strategic Placement Procedure:

    1. Visually identify the exact structural physical breach (e.g., a 1-inch gap underneath a storeroom door).
    2. Place the glue pad directly on the interior floor, orienting it perpendicularly flush against the wall immediately adjacent to the hole.
    3. This specific blocking geometry physically forces the rat to make an immediate, blind 90-degree turn directly onto the trap the exact microsecond it fully enters the room.

    Deployment Matrix: High-Impact vs. Low-Impact Glue Trap Locations

    Placement Location Capture Probability Operational Reasoning
    Centered in the middle of the kitchen floor Near Zero (0%) Rats physiologically refuse to cross brightly lit, open floor plans due to severe instinctual predator exposure anxiety.
    Directly underneath a dusty outdoor basement stairwell Very Low (10%) Heavy airborne particulate dust instantly coats and physically neutralizes the non-toxic adhesive holding power.
    Pressed tightly along the wooden skirting board Very High (85%) Capitalizes directly on the rat’s biological requirement to keep its physical whiskers touching a solid vertical surface.
    Wedged identically between the stove and the kitchen wall Guaranteed (95%+) Forces the rodent through an unavoidable, dark, highly narrow physical choke point containing food odors.

    Is PCI Trubble Gum biologically safe to use around crawling children and pets?

    Unlike chemical organophosphates or neurotoxic anticoagulant baits (like zinc phosphide or bromadiolone), **the industrial adhesive utilized in PCI Trubble Gum is 100% chemically non-toxic and contains zero active pharmaceutical poisons.**

    Essential Glue Trap Household Safety Protocols:

    • Physical Isolation: While absolutely non-toxic, the industrial glue is profoundly strong. You must aggressively hide deployed pads deep inside closed cabinets or structurally underneath heavy appliances where exploring toddlers and roaming pets physically cannot reach.
    • Accidental Pet Adhesion Resolution: If an indoor cat or dog accidentally firmly steps onto an exposed glue pad, absolutely do not panic and never violently tear the pad away. Liberally massage standard liquid cooking oil (vegetable, sunflower, or baby oil) directly into the affected fur and physical adhesive bond. The oil rapidly dissolves the chemical stickiness, allowing the pad to gently slide off.
    • Humane and Sanitary Disposal: Always heavily don disposable thick nitrile gloves before physically retrieving a captured live rodent. Firmly fold the heavy cardboard trap aggressively over itself (like closing a book) to completely physically encompass the animal, place it securely inside a heavy-duty tied garbage bag, and execute immediate disposal in an exterior municipal bin.

    Summary: A foolproof spatial strategy for placing indoor glue traps

    Executing successful residential rodent trapping mathematically relies on outsmarting their rigid biological behaviors:

    1. Locate the Evidence: Actively scan for heavily greasy physical smudge marks, scattered fecal droppings, and fresh gnaw damage strictly along hidden wall bases.
    2. Exploit the Periphery: Never place PCI Trubble Gum in the center of an open room. Every deployed pad must sit absolutely mathematically flush against a solid vertical structure.
    3. Target the Heat and Water: Heavily prioritize the dark, narrow, undisturbed physical channels directly behind the primary refrigerator and deep underneath the main kitchen sink.
    4. Execute Daily Maintenance: Inspect every deployed pad completely silently every single morning. Immediately safely dispose of any captures to prevent secondary indoor decay.
  • Managing Rodents at Home: Glue Traps vs. Poison Baits

    Managing Rodents at Home: Glue Traps vs. Poison Baits

    TL;DR: When exactly should you deploy glue traps versus chemical poison baits?

    For aggressive rats and mice infiltrating Indian homes, non-toxic glue traps like PCI Trubble Gum are the absolute smartest choice for indoor deployment—they provide immediate visual proof of capture and eliminate the severe risk of secondary poisoning to children or indoor pets. Conversely, highly aggressive outdoor poison baits like the zinc phosphide-based UPL Ratol are vastly superior for defending exterior perimeters, agricultural terraces, and deep open drains where mass populations breed, ensuring dead rodents do not decay inside your interior walls.

    Why do rodents constantly keep returning to your home even after you kill a few?

    Physically killing a single foraging rat or trapping an isolated mouse rarely solves a structural infestation. Rodents, specifically the Indian roof rat (Rattus rattus) and the common house mouse (Mus musculus), are biologically highly adaptable survivors:

    • Pheromone Trails: They religiously follow the exact same established, scent-marked routes every single night, physically hugging baseboards and dark edges.
    • Neophobia (Fear of New Things): Mature rats possess a severe innate biological fear of newly placed objects in their environment, allowing them to easily avoid poorly placed, obvious traps.
    • Continuous Infiltration: As long as external physical breaches exist—such as broken AC exhaust vents, uncapped plumbing drains, or 1/4-inch gaps under exterior doors—new rodents will continuously migrate inward to replace the dead ones.

    Therefore, randomly placing a trap in the middle of a room is mathematically doomed to fail. You fundamentally require a holistic, strategic approach that actively intercepts their heavily traveled biological pathways while systematically hardening your building’s physical envelope.

    How do rats and mice behaviorally move inside modern Indian homes?

    Understanding the strict, predictable physical movement patterns of urban rodents is the absolute prerequisite to successful trapping. They do not casually wander; they calculate risk.

    • The Thigmotaxis Principle: Rodents strongly prefer to run with one side of their physical body brushing directly against a solid wall rather than exposing themselves across open, illuminated floor spaces.
    • The Indoor Highways: They exclusively utilize the dark, entirely undisturbed physical space directly behind heavy refrigerators, deep underneath enclosed modular kitchen cabinets, and constantly run along continuous wooden skirting boards.
    • The Prime Entry Points: They actively exploit the absolute smallest physical construction failures—chewing through plastic drain pipes, bypassing broken mesh window screens, and squeezing under poorly fitted wooden doors.

    When is it strategically best to use a glue pad trap like PCI Trubble Gum?

    Commercial glue traps are heavy, flat cardboard or plastic boards thickly coated with a highly aggressive, non-drying industrial adhesive. When a rodent attempts to rapidly cross the board, it becomes instantly and permanently immobilized.

    Buy PCI Trubble Gum (Rat trap)

    The Optimal Operational Use Cases for Glue Traps:

    • Strictly Indoor Environments: Perfectly suited for sensitive residential kitchens, isolated indoor storerooms, and highly trafficked family living areas.
    • High-Risk Safety Households: The mandatory choice for homes actively containing young crawling children, roaming dogs, or indoor cats, precisely where deploying neurotoxic chemical baits represents an unacceptable lethal hazard.
    • Requiring Visual Confirmation: When you absolutely must have immediate, undeniable physical proof that the specific active rodent has been successfully captured and removed from the property.

    Crucial Glue Trap Limitation: Glue traps inherently fail in highly dusty environments (like open basements or active construction zones) or extremely wet locations (like directly inside a dripping sink cabinet), as heavy airborne dust and pooled water instantly neutralize the sticky industrial adhesive.

    When is it strategically best to deploy rodent poison bait like UPL Ratol?

    Agricultural-grade poison baits, such as the highly potent UPL Ratol, are specifically chemically engineered to be highly palatable, actively encouraging mass ingestion by a massive foraging rat population.

    Buy UPL Ratol (Rat poison)

    The Optimal Operational Use Cases for Chemical Baits:

    • Exterior Defense Perimeters: The absolute best tool for heavily targeting deep municipal drains, exterior garbage accumulation zones, and exposed perimeter boundary walls.
    • Large Uninhabited Structures: Highly effective in massive agricultural godowns, rarely accessed open terraces, dark internal lofts, and isolated exterior farm sheds.
    • High Population Density: When the mathematical scale of the outdoor infestation exceeds the physical operational capacity to manually check dozens of individual daily glue traps.

    Comparison Matrix: Glue Traps versus Chemical Poison Baits

    Eradication Method Optimal Deployment Zone Primary Operational Advantages Critical Operational Disadvantages
    PCI Trubble Gum (Glue) Strictly Inside (Kitchens, Rooms) 100% Non-toxic; provides immediate visual proof; drastically safer for household pets. Fails in dust/water; requires meticulous wall-edge placement; demands frequent manual checking.
    UPL Ratol (Poison) Strictly Outside (Drains, Yards) Capable of decimating massive populations; demands far less daily physical monitoring. Severe secondary toxicity risk to non-target pets; rats may decay silently inside inaccessible wall voids.

    Where exactly should you place PCI Trubble Gum to guarantee a catch?

    To successfully capture a rat, you must treat your home’s floor plan exactly like a highly predictable rodent highway map. Placement is exponentially more critical than the physical stickiness of the trap itself.

    1. Total Fridge Encapsulation: Pull the heavy refrigerator out 2 inches. Place the glue pad flush, absolutely flat against the back wall so the foraging rat must directly step onto the pad while attempting to navigate the narrow, warm channel created by the compressor heat.
    2. The Under-Sink Choke Point: Completely clear out the dark under-sink cabinet. Place the pad tightly jammed into the absolute rear corners, directly adjacent to the exact point where the dark PVC plumbing physically breaches the wall or floor.
    3. Perpendicular Doorway Blocking: If a rat is known to squeeze under a specific interior door, place the long edge of the trap tightly and perpendicularly against the wall immediately beside the door frame, effectively blocking the expected turning exit route.

    Essential Safety & Utilization Protocols for Rodent Management:

    • Chemical Bail Handling: You must mandatorily wear thick, disposable nitrile gloves whenever physically handling UPL Ratol or any chemical bait block to prevent unintentional biological skin absorption and to prevent transferring human scent onto the bait itself.
    • Bait Station Mandate: Never casually throw loose chemical poison directly onto open ground or bare countertops. Chemical baits must rigorously be locked inside heavy, tamper-resistant black plastic bait stations if deployed anywhere remotely near roaming household pets or local wildlife.
    • Safe Glue Disposal: When utilizing PCI Trubble Gum, always wear gloves to physically retrieve the captured live rodent. Fold the heavy cardboard trap aggressively over itself to fully encompass the animal, place it securely inside a thick, heavy-duty black garbage bag, tie tightly, and execute immediate exterior disposal in accordance with strict local municipal sanitation laws.
    • Accidental Pet Encounters: If a household pet accidentally strongly adheres to a Trubble Gum pad, do not violently pull. Liberally apply standard liquid cooking oil (vegetable or olive oil) directly to the adhesive bond to gently and safely dissolve the industrial glue from the animal’s fur.

    Summary: Executing a holistic rat management masterplan

    Eliminating rodents permanently requires an integrated dual-pronged strategy, not a single miracle product:

    1. Aggressively map the physical perimeter: Identify all fresh droppings, hard greasy smudge marks on baseboards, and active chewing damage.
    2. Secure the interior envelope: Deploy non-toxic PCI Trubble Gum strategically flat against the interior baseboards explicitly behind all heat-generating kitchen appliances.
    3. Defend the exterior perimeter: Responsibly deploy localized bait stations filled with UPL Ratol specifically near deep exterior drains and identified dense outdoor nesting areas.
    4. Execute permanent exclusion: Physically mandate sealing all identifying exterior wall gaps, installing heavy steel mesh over active drain outlets, and adding tight rubber weather-sweeps under all exterior doors.